Introduction
#Hello There! and welcome to my blog about learning git and GitHub as a beginner. Today we are going to dive into a really famous and also widely used version control system, which is git. Along with its helper-site that allows you to have a cloud space to manage a remote version of your project's code and other files. So without any further ado, let's dive into this tool shall we?
Introduction To Git
#As said before, git is a version control system for your project. But what does a version control system even mean ? A version control system is a system that allows you to track all the changes made in your project's files by keeping a log of its history. You can view this history any time using git commands. This also allows you to jump back to any older version of your project where you had not applied the latest changes.
Benefits Of Using Git
#Think of git as a safe system that allows you to manage your project in such a way that if anything goes wrong and your project starts to look like as if it is becoming a mess, you can just go back to a checkpoint where it was not a mess. Great thing isn't it ? Not to mention that git does all of this locally on your system meaning that the absence of an internet connection won't hinder your workflow at all, a developer's dream. When we get into GitHub later on, we will also discuss an additional feature that git provides us in the domain of collaboration with a team during project management. However, all the features related to GitHub will require a stable internet connection because GitHub is a hosted site and doesn't run on our local machine unlike git itself.
Git Installation
#With that out of the way, let's start with how to setup git in our system. This is gonna be an easy process don't worry and just follow along step by step slowly. First of all we need to download git, we can do this by going to git's official download site at "
Git Download Site". You will see a page that looks like this.
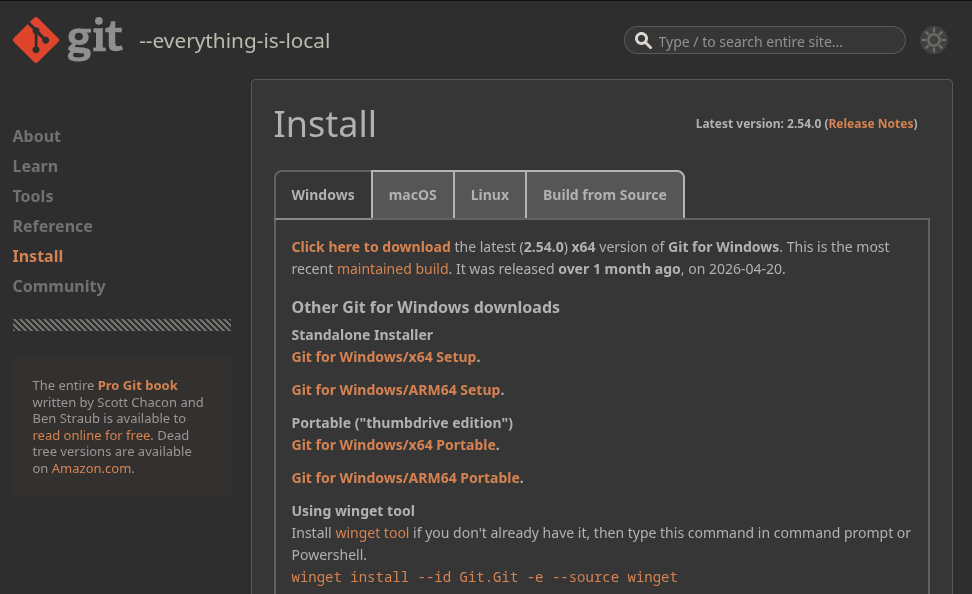
Now if you are installing git on windows, you can download any of these setups and follow the on-screen instructions to install git on windows, you don't really need to change any configurations while running the setup, just keep pressing next until it starts the installation. Now if you are installing git on Mac OS or a Debian Based Linux Distro, you can go to the Mac or Linux Tab and follow the given commands to install git. However, I am running Arch Linux and the git site doesn't provide the respective installation process so I will tell you how to do it on Arch as well. don't worry, all you need is a single terminal command:
After this, you can also verify the git installation using the following command:
This command will show your installed version of git, this shows that git has been properly installed in your system and you are ready to move on with it. Now that we are done with installation of git, let’s start with orientation of GitHub as well to learn these tools in parallel and get the best out of them.
Introduction To GitHub
#GitHub is basically a website that you can use in combination with git, this site allows you to have a cloud based management system for your projects. It also provides a more GUI approach towards git itself as well. Where git manages your project locally, GitHub manages it remotely. Basically when you use git and GitHub together, your project is saved in two forms. These two forms are:
- Local (On Your System)
- Remote (On Your GitHub)
Ideally, you should keep both of these in sync so that your project stays updated and there are no gaps between your local data and remote data. Also, git and GitHub manage your project using Repositories. Repository is just a fancy name for a folder in GitHub terminology. In short, a repository is also called a "Repo". So you have a Local Repo and a Remote Repo.
GitHub Setup
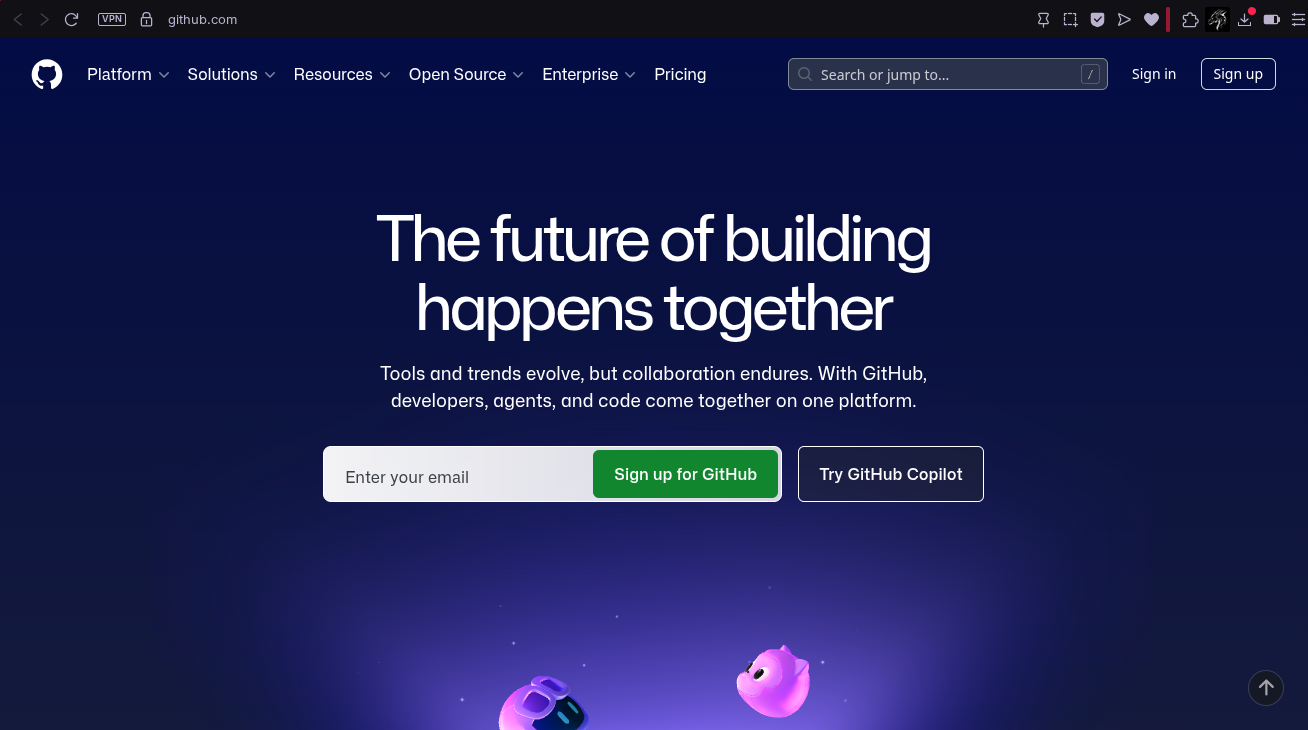
#Now that we have already installed git, let's setup our GitHub so that we can get into learning them both. First you need to make an account on GitHub by going to the official GitHub site at "
GitHub Site". Now you can make a GitHub account by entering your email and clicking "Sign up for GitHub" button, then you will need to verify your account using your email and the account will be created. Or if you already have a Google account, you can use that to sign-in as well using the sign-in option at the top right of this webpage as shown here.
Since I already have a google account, I will login using that account and then we will go through the GitHub's understanding regarding its interface and all.
GitHub GUI
#When you sign in your GitHub's interface might look quite empty as compared to mine. That is because your account is new and you haven't added much to it yet whereas mine has been in use for quite a while now. Anyways, let's familiarize with GitHub's GUI. Here is an image of my GitHub's home page.
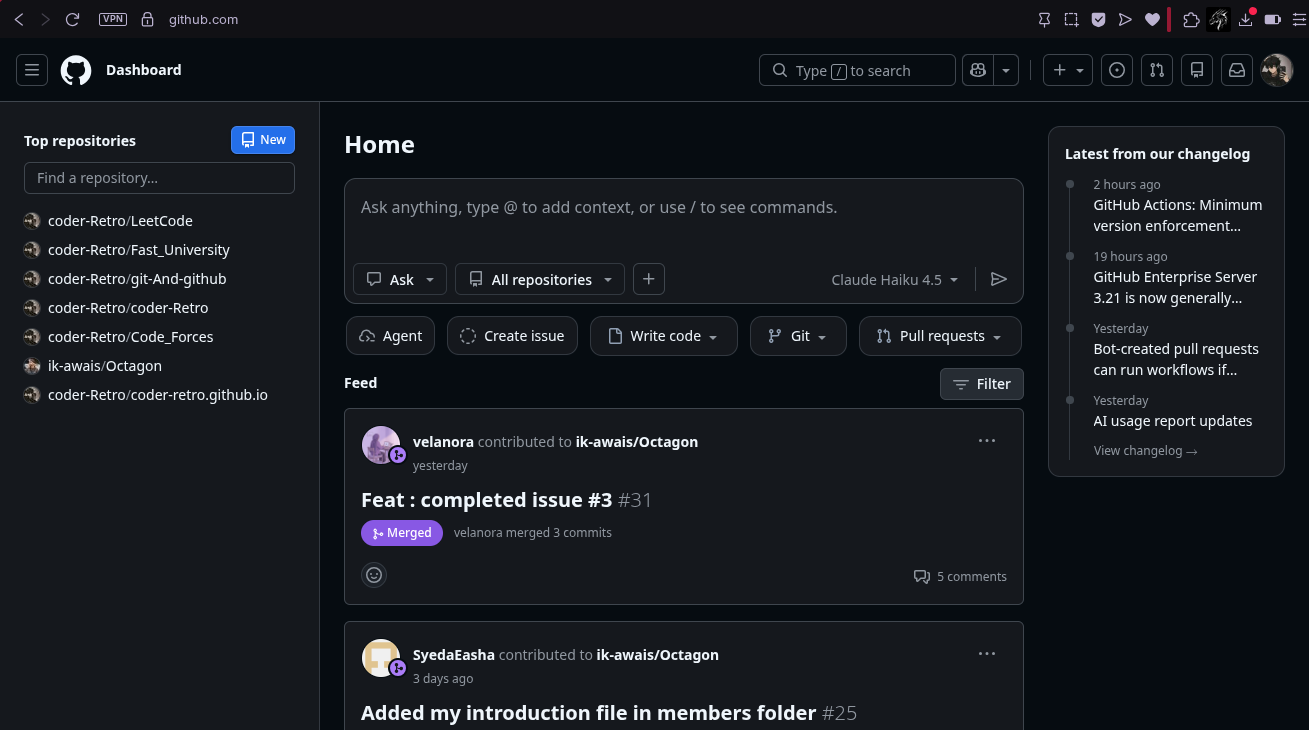
If you take a look at that list on the left side of my GitHub's home page, these are my remote repositories that are managed by GitHub. Even this blogsite that you are looking at right now, its code is being maintained using git and GitHub, as you can see by looking at the bottom-most repo. So any repos that you will make are going to appear in this column later on. Then there is the "News/Updates" Section in the middle of the page which shows the latest updates of any activity on GitHub. That should be all for the home interface for now. Let's start configuring git.
Git Configuration
#When we are about to use git for the first time after installation, there are some one time commands that we need to run in order to configure git. First we need to tell it about the account that it will be handling on GitHub remotely.
Username & Email
#For this, we need to provide it with the username and email of that account. Now my name is coder-Retro and email is hasnainqadri9c@gmail.com, but you shall replace my credentials with yours. Username and email are configured as:
git config --global user.name "coder-Retro"
git config --global user.email "hasnainqadri9c@gmail.com"
Verification
#Then you can also verify your configuration using the following git command:
This will show the current configured username and email that git is handling. After this one-time setup is done, let’s create our first Local Repo using git.
Repository Setup
#In order to make a local repo, we need to make a folder on our system. Name this folder as your project's name for easy management and organization. For example if our project is called Demo, then make a folder by the name "Demo". You can do this using command line by running the following command:
Then we need to enter this folder, you can do this by running the command:
Local Repo
#By now, we are inside our project folder, now we need to turn this folder into a local repo using git. We can use git's repo initializing command for this purpose, this command is the most basic git command and it goes like this:
git init
git branch -M main
What this does is that it turns the current folder into a local repo and the second command renames your current branch to “main”, by default it’s named as master. We will learn what a branch is when we get there, for now just let it slide and don’t sweat it. Git starts monitoring any files in this folder (Local Repo) from now on. Hence, git is active and in action now.
Remote Repo
#After this we need to make a remote repo using GitHub which we will then connect this local repo to. In order to create a remote repo, go to your GitHub's home page and look for the "plus icon with a dropdown menu" in the navigation bar. Click the dropdown arrow and you will see the following options in the list that appears:
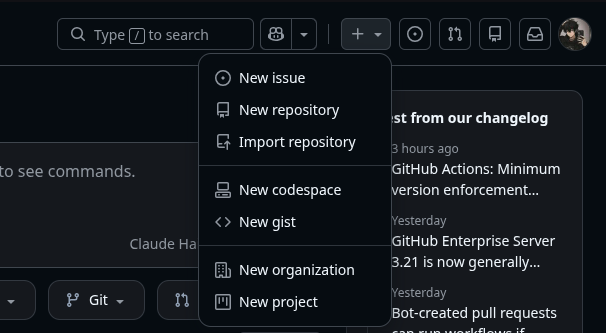
Select the "New repository" option. You will be greeted with repo creation page, name your remote repo same as your local repo for easy management. Since my local repo was named Demo, I will name remote as Demo too.
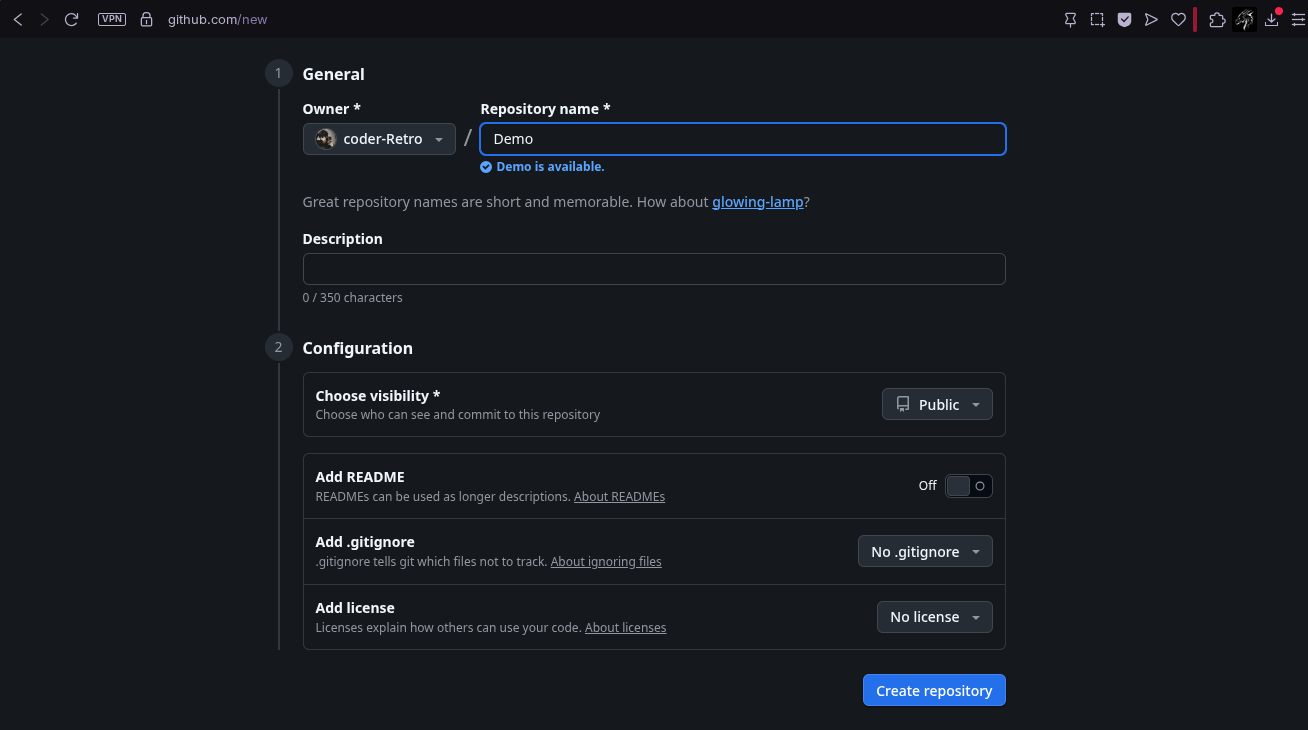
For now, don't change any other settings and just click on "Create repository" button at the bottom right. Now you will be greeted with a new page that contains our repo's HTTPS URL which we need to copy. We need this to connect our local repo to remote repo. Copy the URL by clicking at the following button:
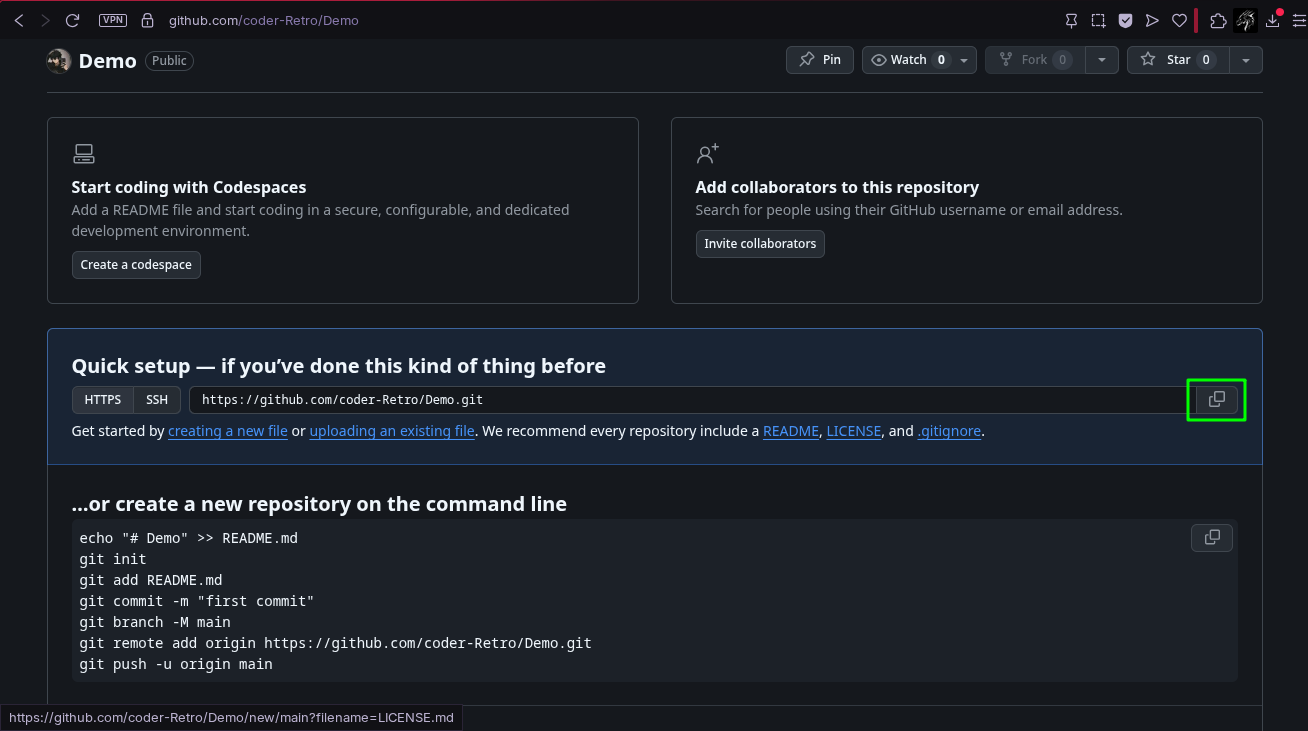
Now we can go back to connect our local repo to remote repo using terminal.
Connect Local to Remote
#In order to connect our local repo to remote repo, run the following command but replace my repos HTTPS URL with your repo's:
git remote add origin https://github.com/coder-Retro/Demo.git
This command connects our local repo to the remote repo and allows the communication between both of them from now on, we can tranfer data from local to remote and vice versa now. Congratulations on making your first repository. Next up, we will learn how to add contents to our repos.
Add Files to Local Repo
#Let's create a simple cpp file in our local repo and then try to save it to our remote repo as well. Let's create a simple test.cpp in our local repo:
#include<iostream>
int main(){
    std::cout << "This is my Demo Project";
    return 0;
}
Now save this file in your local repo. Let’s see if git is tracking our file or not. For this, run the command:
You will see the following on your terminal:
On branch main
No commits yet

Untracked files:
  (use "git add <file>..." to include in what will be committed)
        .vscode/
        test.cpp

nothing added to commit but untracked files present
(use "git add" to track)
This means that git is not tracking your test.cpp yet, in order to make git track it, run the following command:
This command tells git to track all the files in the current folder. Now run the status command again and you will see this now:
On branch main
No commits yet
Changes to be committed:
  (use "git rm --cached <file>..." to unstage)
        new file:   test.cpp
This means that git has started tracking your test.cpp.
Add Files to Remote Repo
#Now let's save this file onto our remote repo as well using the following two commands:
git commit -m "Any Message"
git push origin main
The first command creates a snapshot of your current added file. Then the second command sends that snap shot to the main branch in your remote repo.
GitHub Authentication
#When you run git push origin main for the first time, your terminal will prompt you for a Username and Password. Do not enter your standard GitHub account password! Since 2021, GitHub requires a Personal Access Token (PAT) for command-line operations. Here is how to fix this. Go to your GitHub settings:
- Go to Developer settings
- Go to Personal access tokens
- Go to Tokens (classic)
- Click "Generate new token (classic)
- Give it a name (e.g., "GitCLI"), and check the repo box.
- Click "Generate token" and copy it immediately
- Note: You won't be able to see it again!
- Enter this token when your terminal asks for your "Password."
After you are done with this procedure, run this command again.
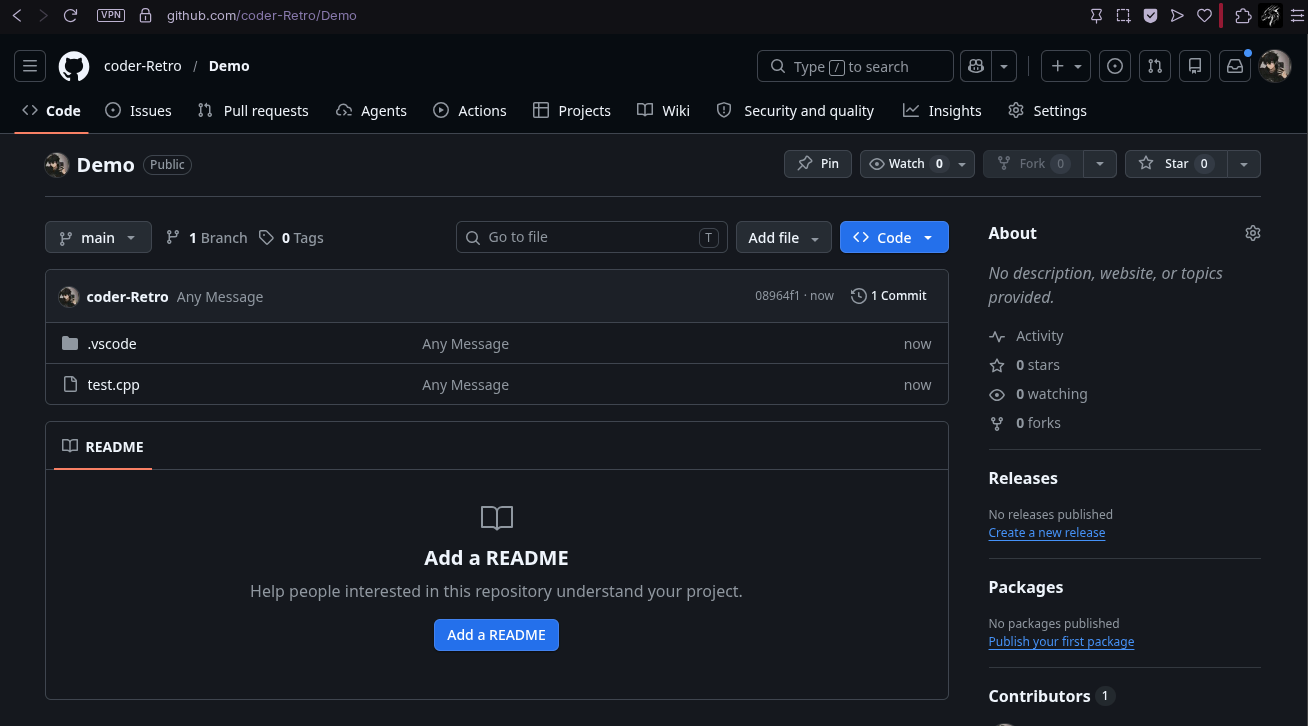
Now if you go back to you GitHub and open the Demo repo and refresh the page. You will see that your test.cpp has appeared in remote repo. You will also see the text “Any Message” in front of it, this is called a commit message and people use it to determine what change they performed in the pushed file.
Gitignore File
#Now if you are using vscode as your editor, you might have noticed that a folder by the name of .vscode might have appeared aside from your test.cpp, vscode stores some language based settings in this folder. However we don't want to push this folder to our repo but it still appears when we try to push our test.cpp, so let's tell git to ignore this folder using a really useful file that git offers us, ".gitignore". First, create a new file named exactly .gitignore in the root of your local project folder (make sure it starts with a dot and has no extension like .txt). Open it, type the following folder exclusion pattern in your ".gitignore":
Then save and close it. Now, because we ran git add . in our previous step, Git has already indexed and started tracking our .vscode/ folder! Simply creating a .gitignore file won’t stop git from tracking files it has already noticed. We need to clear it from git’s active tracking memory first. Run this specific sequence of commands to untrack the folder and push your new rules to GitHub:
git rm -r --cached .vscode
git add .gitignore
git commit -m "Add: .vscode to gitignore"
git push origin main
The first command tells Git to safely drop .vscode/ from its tracking registry without deleting the actual files from your hard drive. The subsequent commands log your .gitignore rules into your history and upload them. If you open your remote repo on GitHub, you will notice that the .vscode/ folder has vanished from the cloud while remaining fully intact on your machine. From this point forward, Git will silently ignore it on every single push.
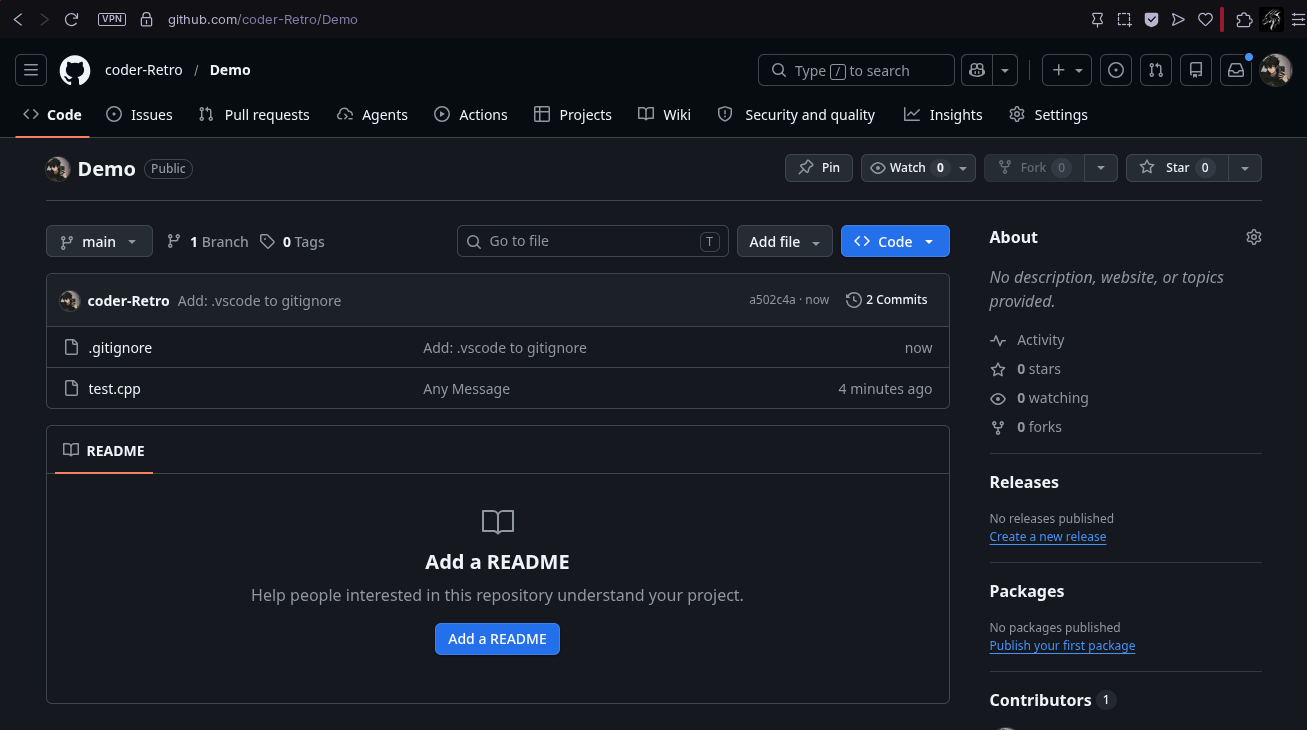
Just now, we pushed our code directly to main branch in the repo, for now it's okay since we are learning git and GitHub as beginners but later on we will learn how it is not recommended to push directly to main branch. In order to understand this, we need to learn what branches are and how to use them. But before moving on to that, I recommend taking a break and practice all that you have learnt up until now to let it sink in. When you have developed a good grasp on it, continue to branches.
Working Tree & Branches
#When we are working on git and GitHub, we need to know how it is structured and handled inside our repo, basically our entire project is organized similar to a tree structure and you can say the branch that we just pushed our test.cpp to, yes the "main branch" is the trunk of this tree. Our main branch holds the deployed version of our project which means that all the code on our main branch, is deployed in the field. Then how do we add new features to it? How do we maintain the features without compromising the main deployed code? How do we test and experiment with new features without ruining our actual project? That is where feature branches come in. A feature branch is basically a branch that diverges out of the main branch, we use this branch to create a separate copy of our project and work on that copy so that we don't modify the actual project on the main branch. When our modifications are completed and we have tested the new feature, we merge our feature branch back into our main branch to apply these new features to the deployed project. This entire branch structure is called a "Working Tree".
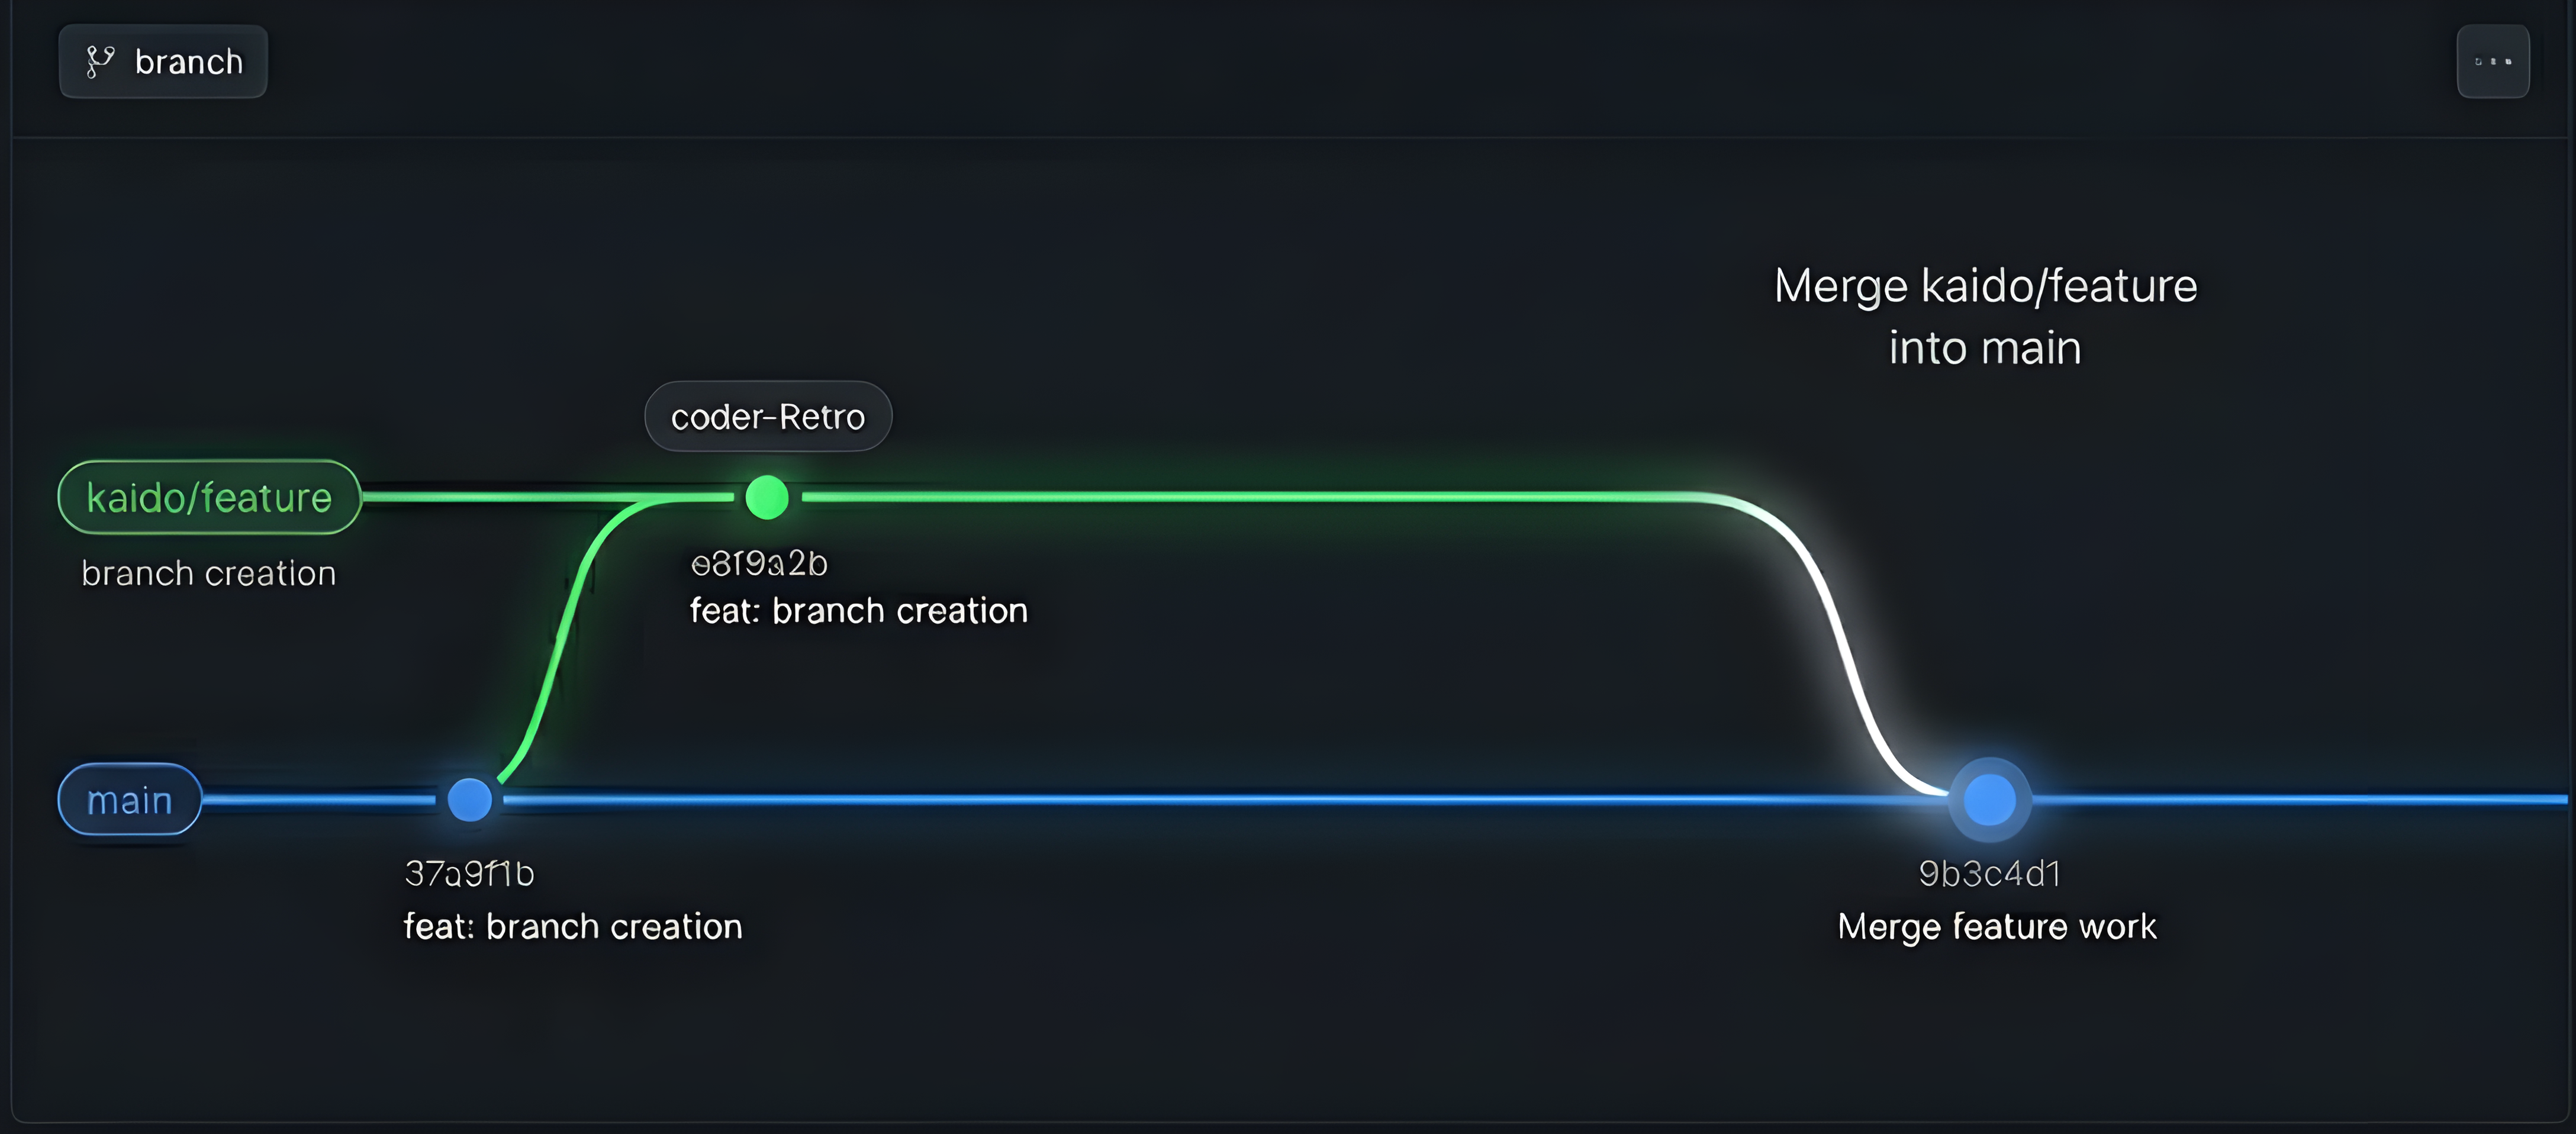
So basically when you are working on your project, it is preferred to make a feature branch and work on that so that your main project remains safe. And this is why it is not recommended to push directly onto the main branch as we did before. Now that we have learnt what a branch is, let's try to make one and then we will use that branch to add some more features to our test.cpp.
Feature Branch
#Before making our feature branch, it is a convention that we must sync our local repo to our remote repo. We can do this by running the following command in our terminal:
git switch main
git pull origin main
The first command makes sure that we are on our main branch. If you are already on the main branch, you can skip this command. Then, the second command fetches the files from remote repo onto our local repo to make sure that our local repo has the latest updates before we start working on anything. First we need a name for our feature branch, for now we will name it “feature-branch”. Now let’s make our feature branch by running this command:
git switch -c feature-branch
This command not only makes a new feature branch but also takes us to it. You can also check which branches your have in your repo and your currently active branch by running this command:
You will see the list of all current branches on your repo and your currently active branch will be marked with a “*” symbol. My Demo Repo’s branch list looks like this right now:
The “*” symbol shows that I am currently working on the feature branch, you can switch between branches using any of the following two commands:
git checkout targetBranchName
git switch targetBranchName
Now anything we do on this feature branch will not modify the main branch itself. Let’s verify this by editing the test.cpp on this feature branch. Open your test.cpp and add a line in the main function after the last cout:
#include<iostream>
int main(){
    std::cout << "This is my Demo Project";
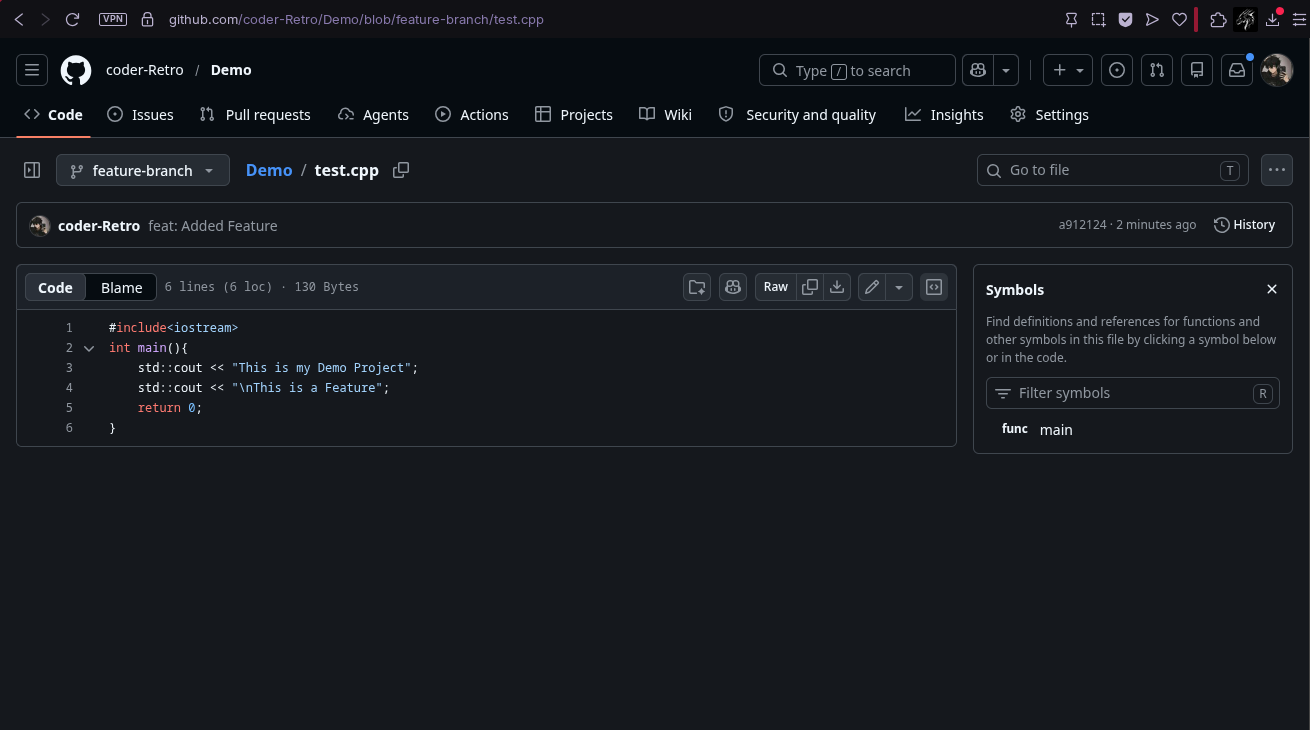
    std::cout << "\nThis is a Feature";
    return 0;
}
Save your file and then add, commit and push it to your feature branch using the previously learnt commands:
git add test.cpp
git commit -m "feat: Added Feature"
git push origin feature-branch
Now go to your GitHub and open your test.cpp, your will see something like:
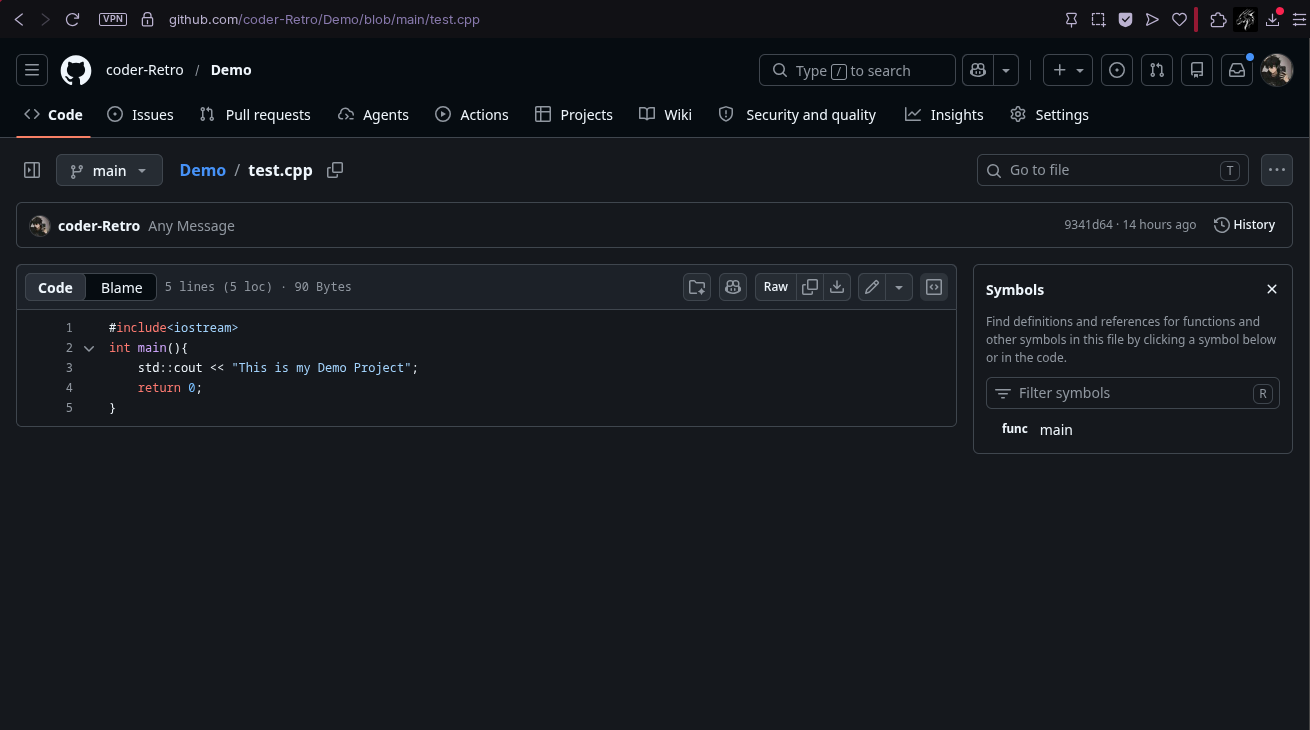
As you can see, the code hasn't changed. This is because we pushed the code to feature branch this time and not the main branch. Let's look at the code in our feature branch to see if our changes are showing there. You can do this by opening the branch drop down menu and selecting feature branch as shown:
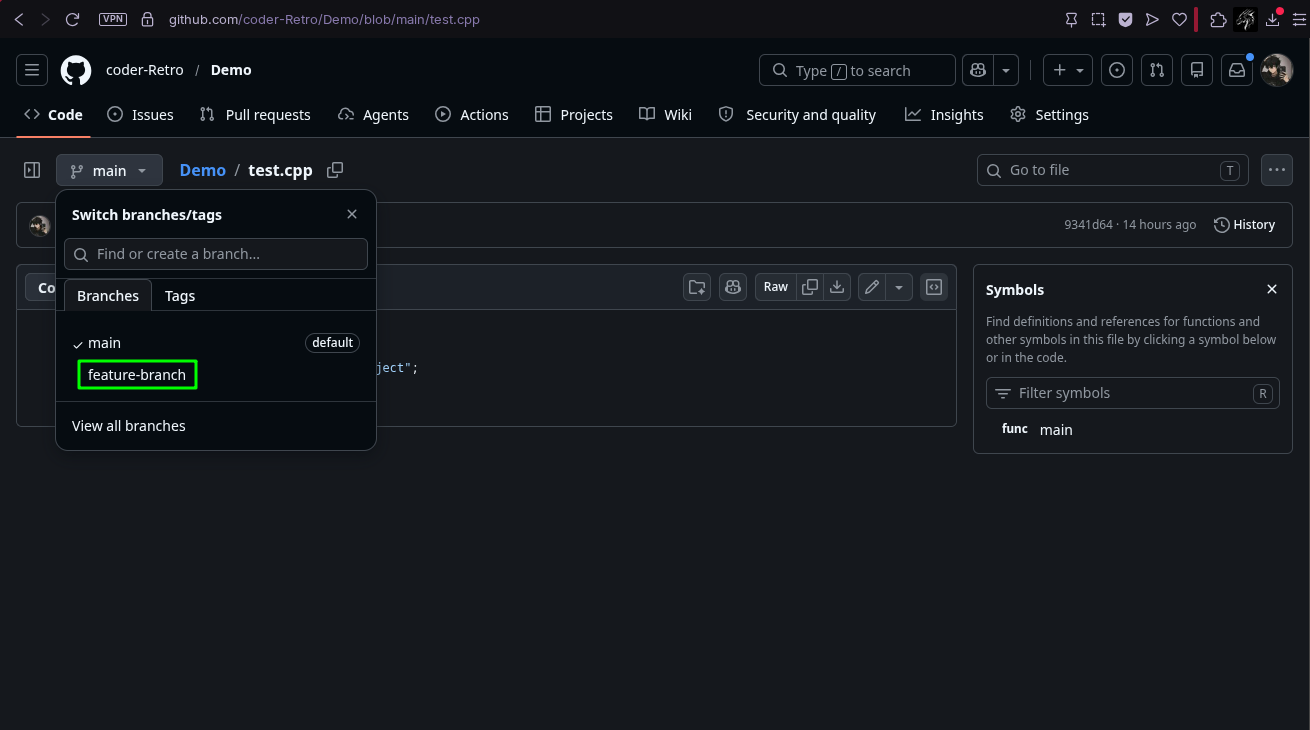
This will take you to your feature branch and now you can see the updated feature code that you have pushed to your feature branch. It should look something like this:
Merge Feature Branch
#So now, we know how to update our local repo to remote repo, make a feature branch and switch to it, modify file on the feature branch and push it to feature branch, how to view our feature branch on GitHub. All while not disturbing the main branch. Now let's say that our feature is working perfectly fine and we know that it is ready to be deployed. Then we need to merge our feature branch back into main branch. There are two ways you can do this:
- Through Command Line using git
- Creating Pull Request using GitHub
Git Method
#If you are working on your project as a solo developer in your personal repository then git method is the most suitable for this scenario. For this, you need to first switch to your main branch and then run the merge command as:
git switch main
git merge feature-branch
git push origin main
The first command switches control to your main branch in local repo, the second command merges the updated files from your feature branch into your main branch in local repo, then the third command updates your remote repo’s main branch with these modifications as well. You can verify these change by going onto your GitHub and checking the file in main branch to see updates.
GitHub Method
#If you are working on a project with a team in a collaborative repository, it's preferred to use the GitHub method which requires you to generate a "PR", which stands for "Pull Request". It is basically a sort of letter that carries your updated file from your feature branch attached with it. Your team first reads your file to make sure that it doesn't require any changes to be made before it goes into the main branch for merge. When you are provided a certain number of approvals by your team, then you are allowed to merge your feature branch back into the main branch. This makes sure that one individual doesn't accidentally alter the main branch without the approval of the team. Let's learn how to generate a PR now after pushing to our remote repo's feature branch. First, go to your remote repo on GitHub. You will see an option to "Compare and Create Pull Request" that came when you pushed to remote's feature branch. However if you don't see this option, simply click on "Pull Requests" as shown here:
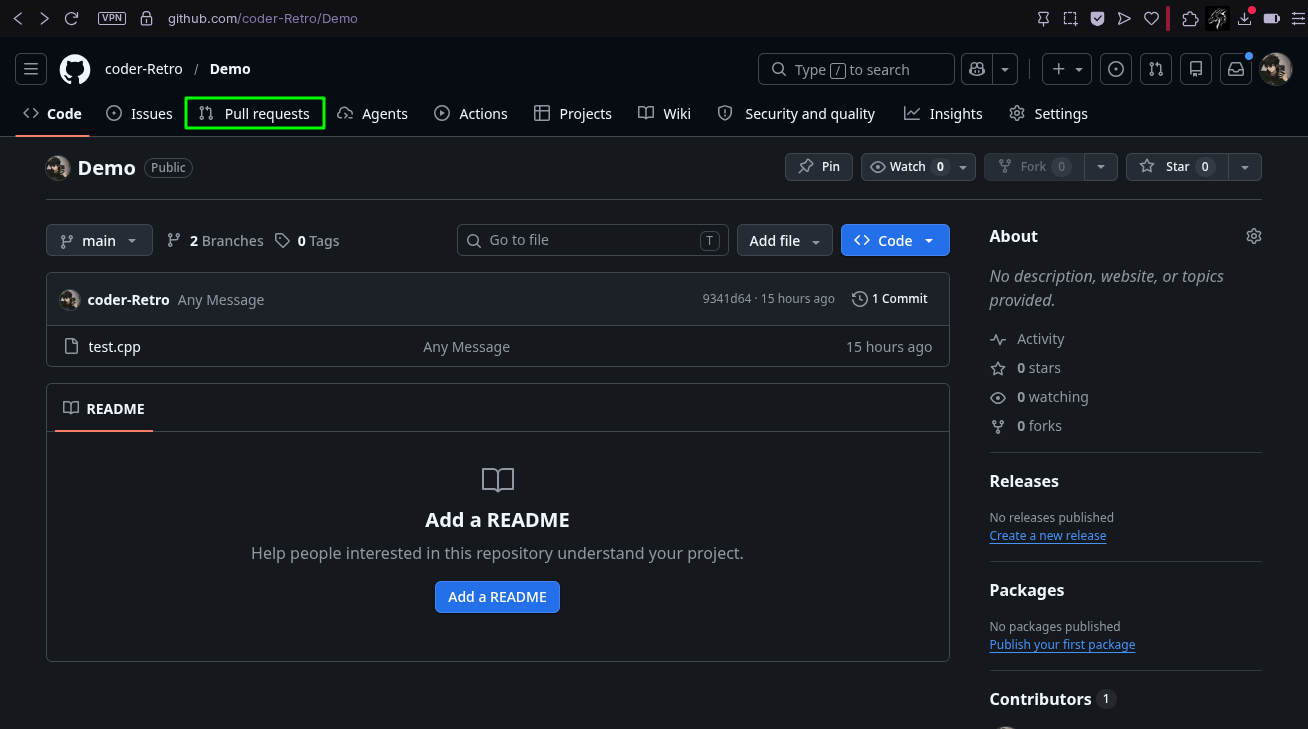
Then you will come to "PR section", from here you can generate your PR using the "New Pull Request" button at the top right of this section as shown in here.
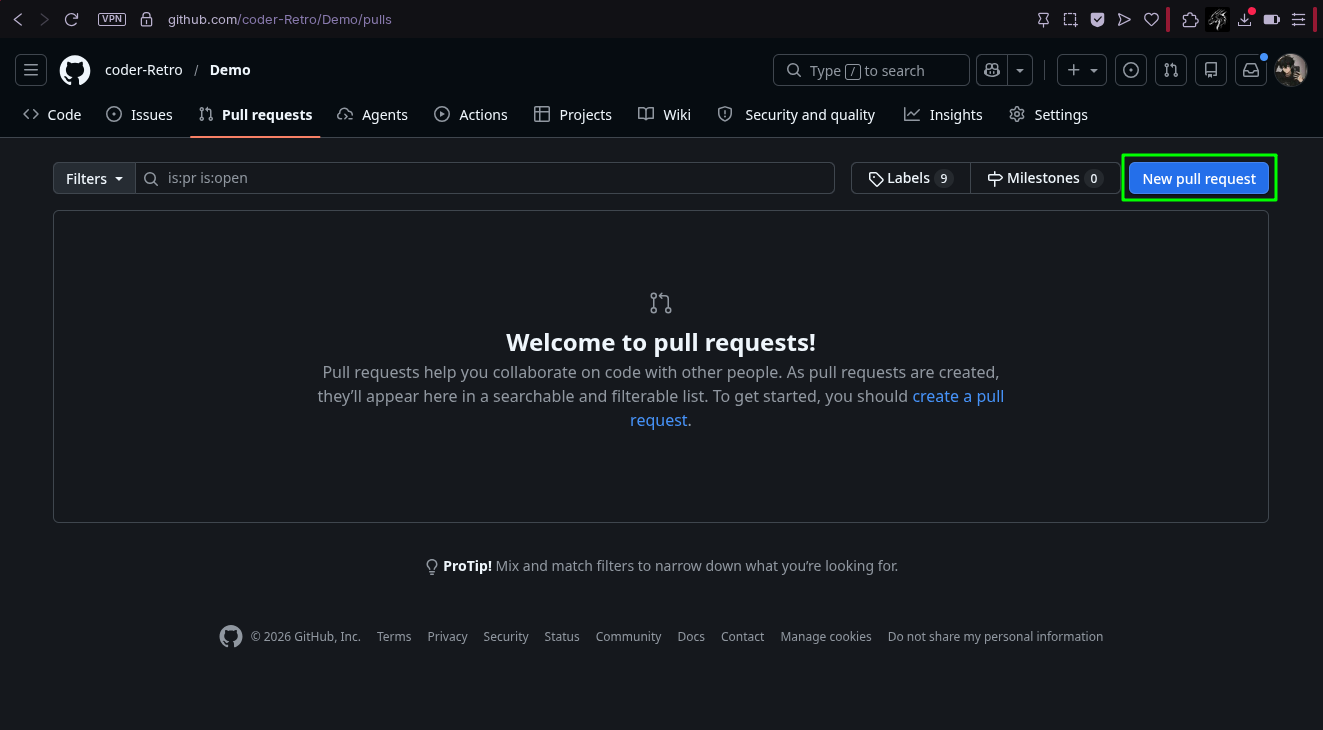
You will be greeted with the file that you are about to send along with your PR to be merged into the main, review the file and make sure that it is as you intended it to be, like my file has my added feature line in it as shown here:
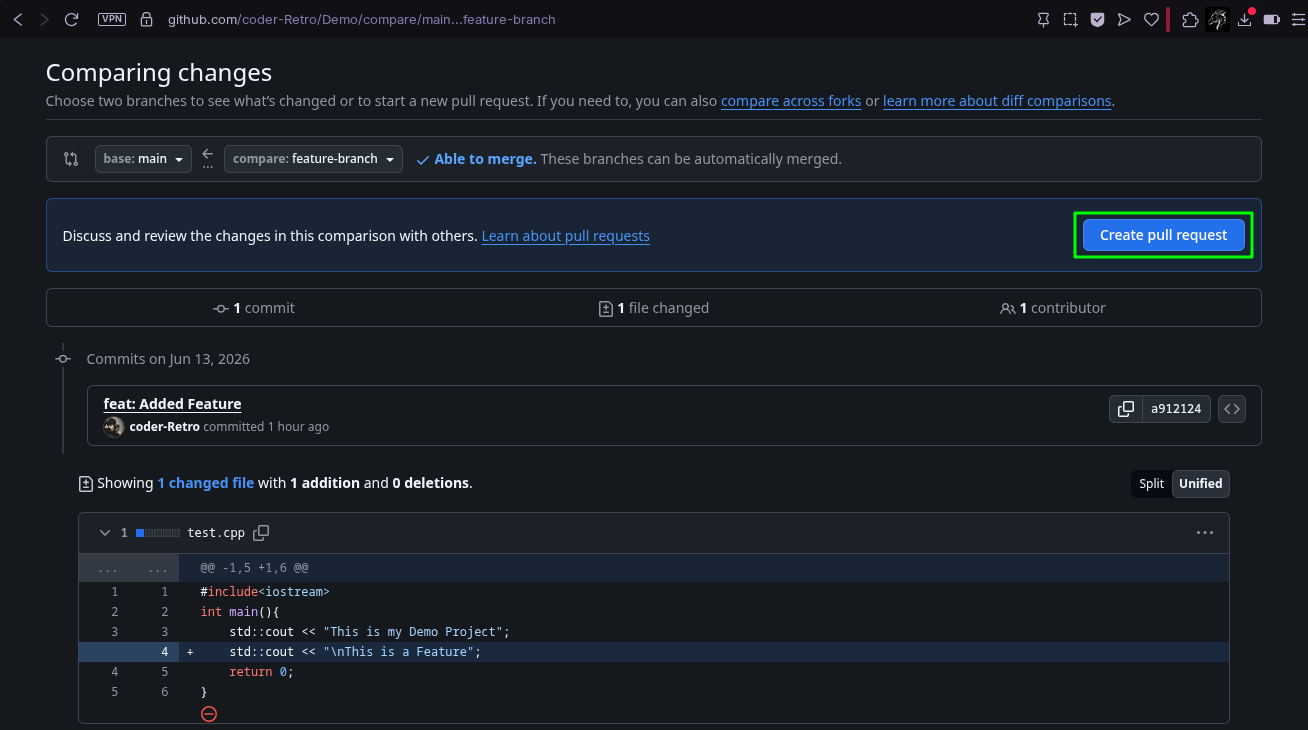
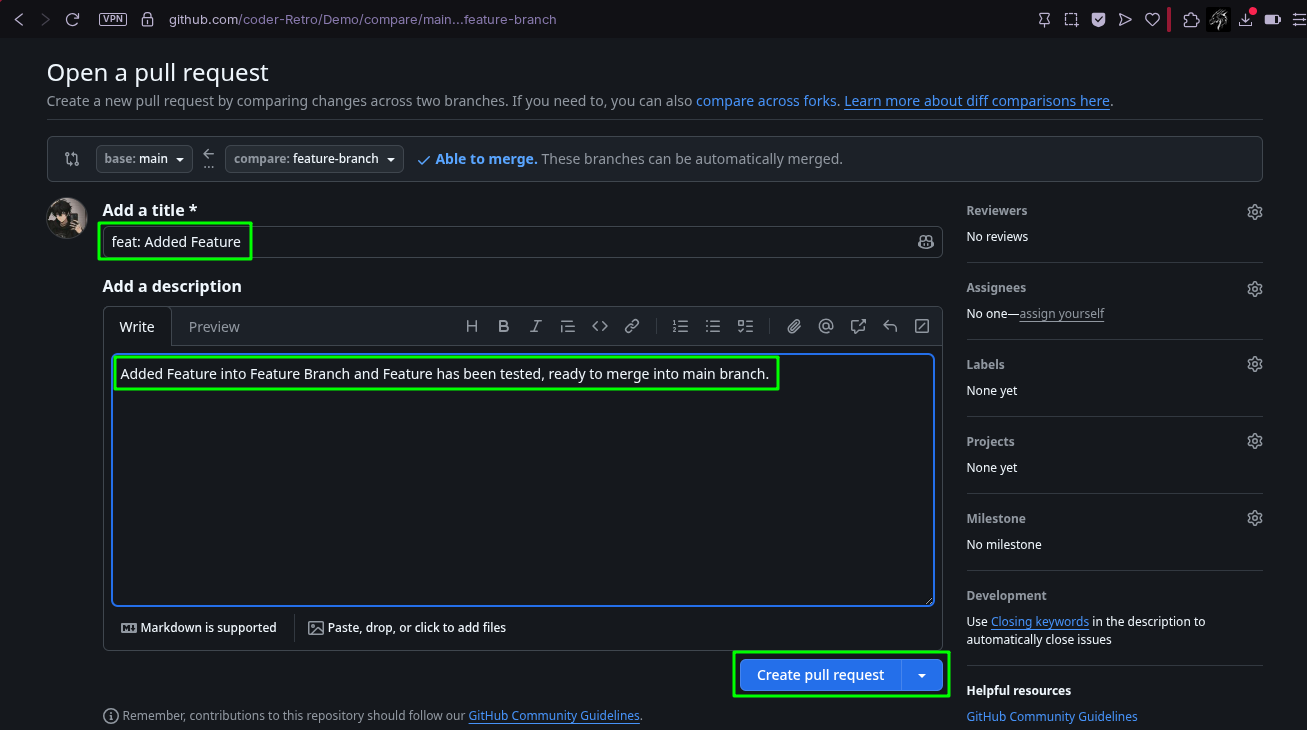
Then click on the "Create Pull Request" button at the top right of this section and you will be taken to the final configuration for your PR. Here you will select a title (first highlight), then provide a description (second highlight) and finally click on "Create Pull Request" (third highlight) at the bottom of this page. This will finalise and submit your PR for your team to review before you can merge.
Now go back to "Pull Requests" tab and you will see your PR waiting there, click it to open it and check the current status of our PR. If you are working with an actual team in a collaborative Repo, you will see something like this in your PR:
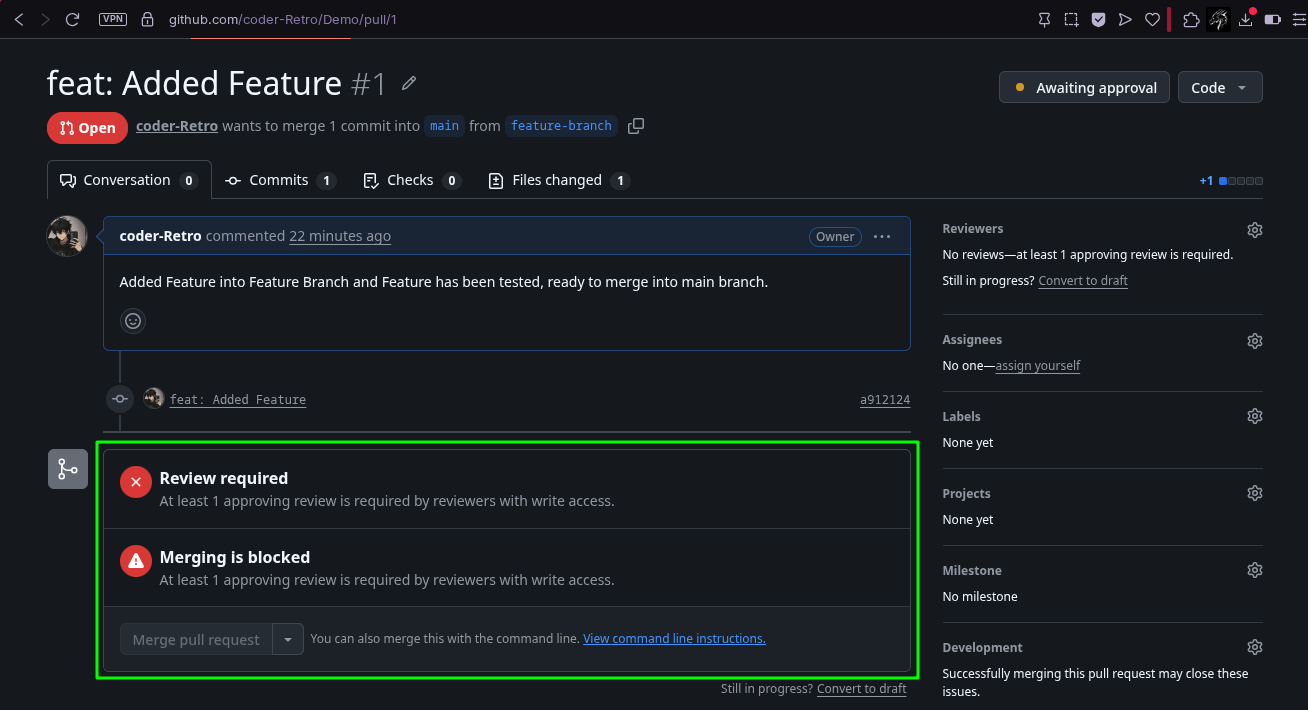
Merging will be blocked until a specified number of people from your team have approved your PR. For now, this is my own repo so I have set the number of required approvals to 1 and then I asked one of my amazing friends to volunteer as a reviewer for my PR. So I invited my friend "Velanora" as a collaborator in my Demo Repo. Let's add her as a reviewer on this PR so she can review and approve it for us which will allow us to merge our feature branch into main branch then. We can add her as a reviewer by selecting her from the "Reviewer's Menu" like this:
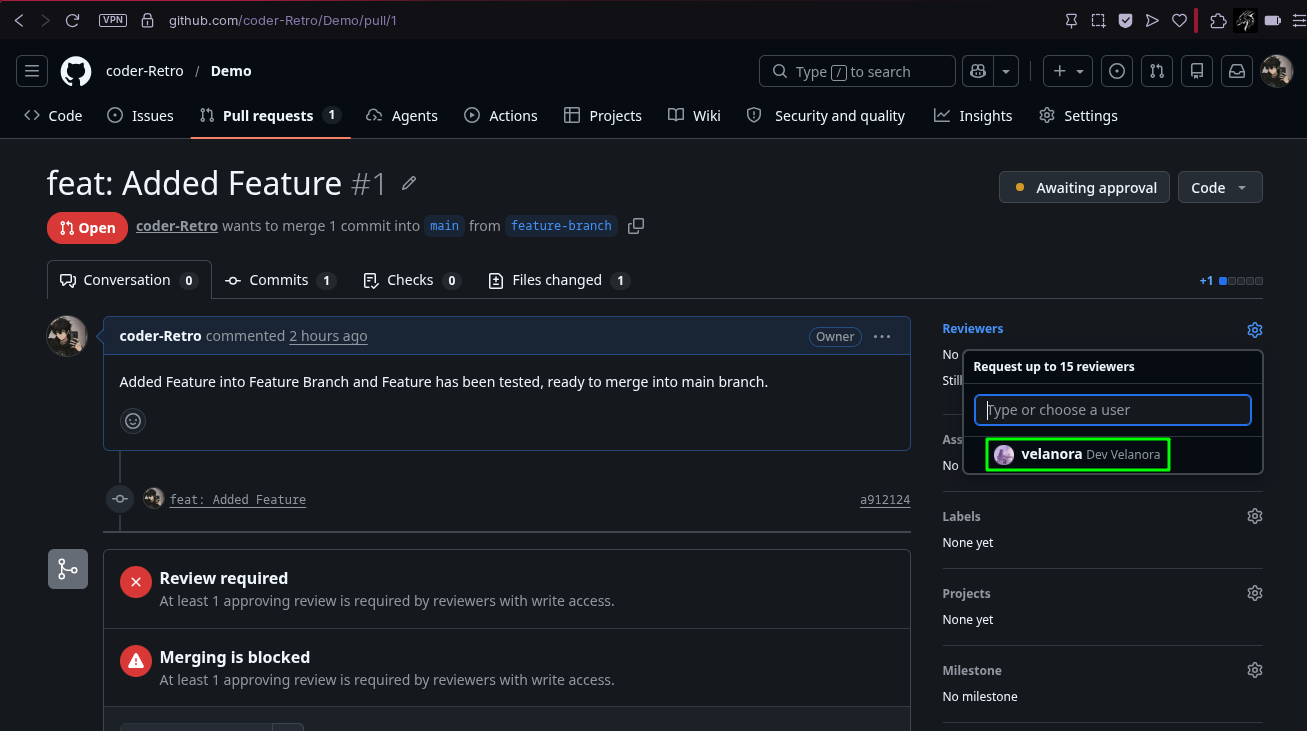
After we select a reviewer by clicking on them, we can save them by clicking outside the reviewer's menu. Our Reviewer will receive a notification from GitHub telling them about their required approval in our PR. Then we will have to wait for them to review our PR. We can see that our reviewer has approved our PR or not by a symbol next to their name in Reviewer list on the right side. If the symbol is a yellow dot, they have not approved our PR, if the symbol is a blue/green tick, they have approved the PR.
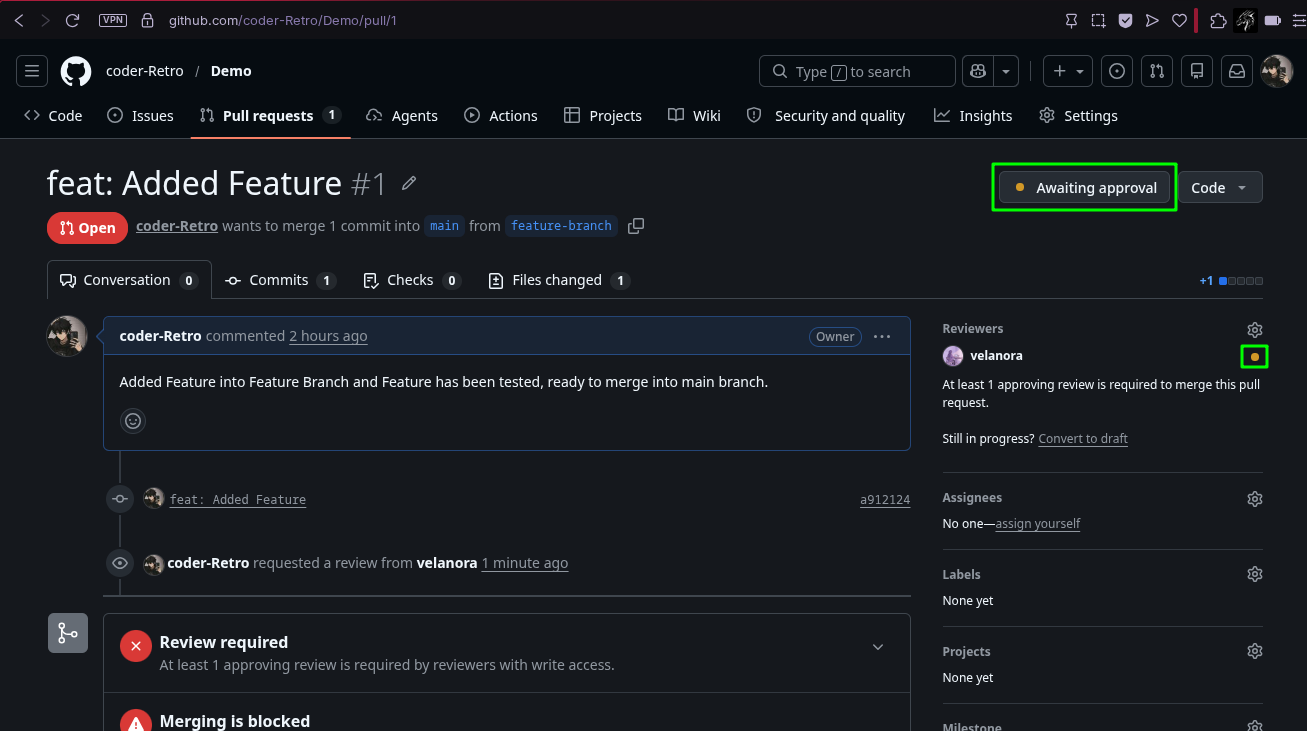
After reviewing, our reviewer can either request changes or they can approve it depending on the requirement of the project. If they request changes, we will still be barred from merging then, but if they approve our PR, yellow dot will be replaced with a blue/green tick and we will be allowed to merge.
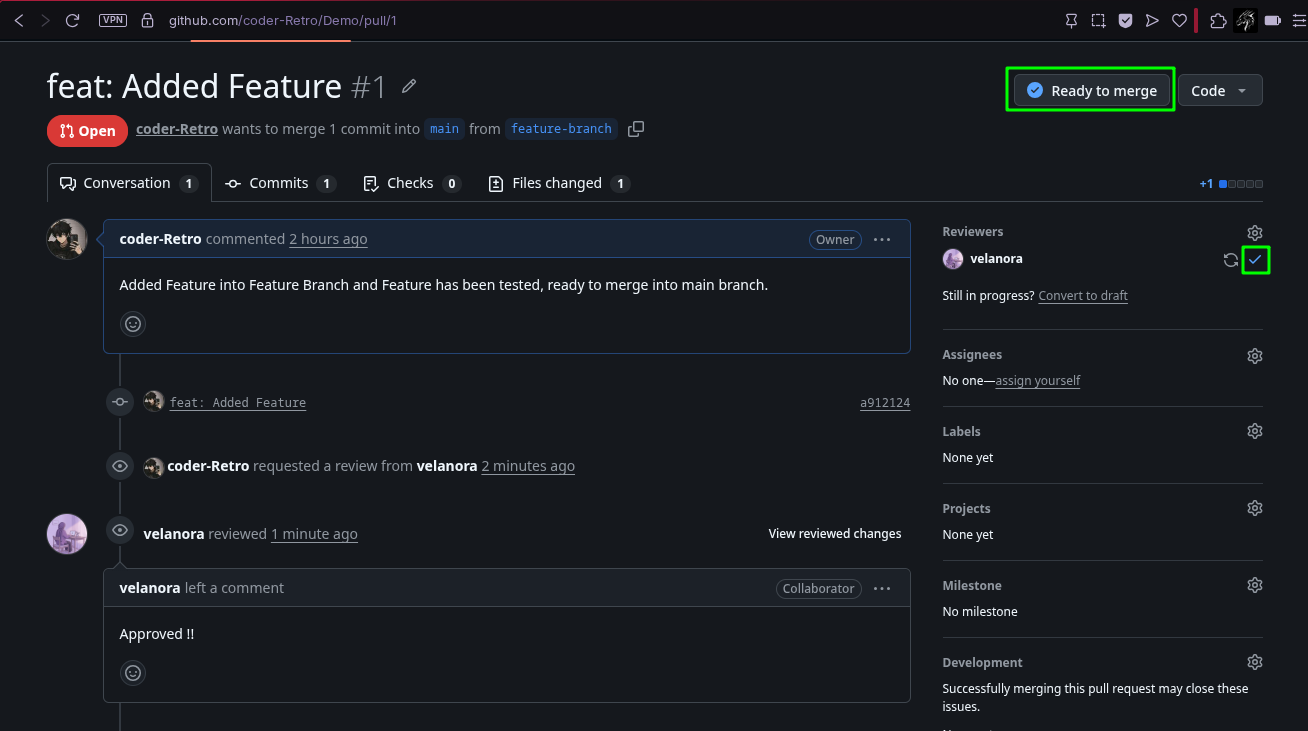
Once our PR has gotten the required amount of approvals, we can go back to our PR and we will see that our merge option has been unlocked. If everything has gone accordingly, our PR should have an unlocked merge option like this:
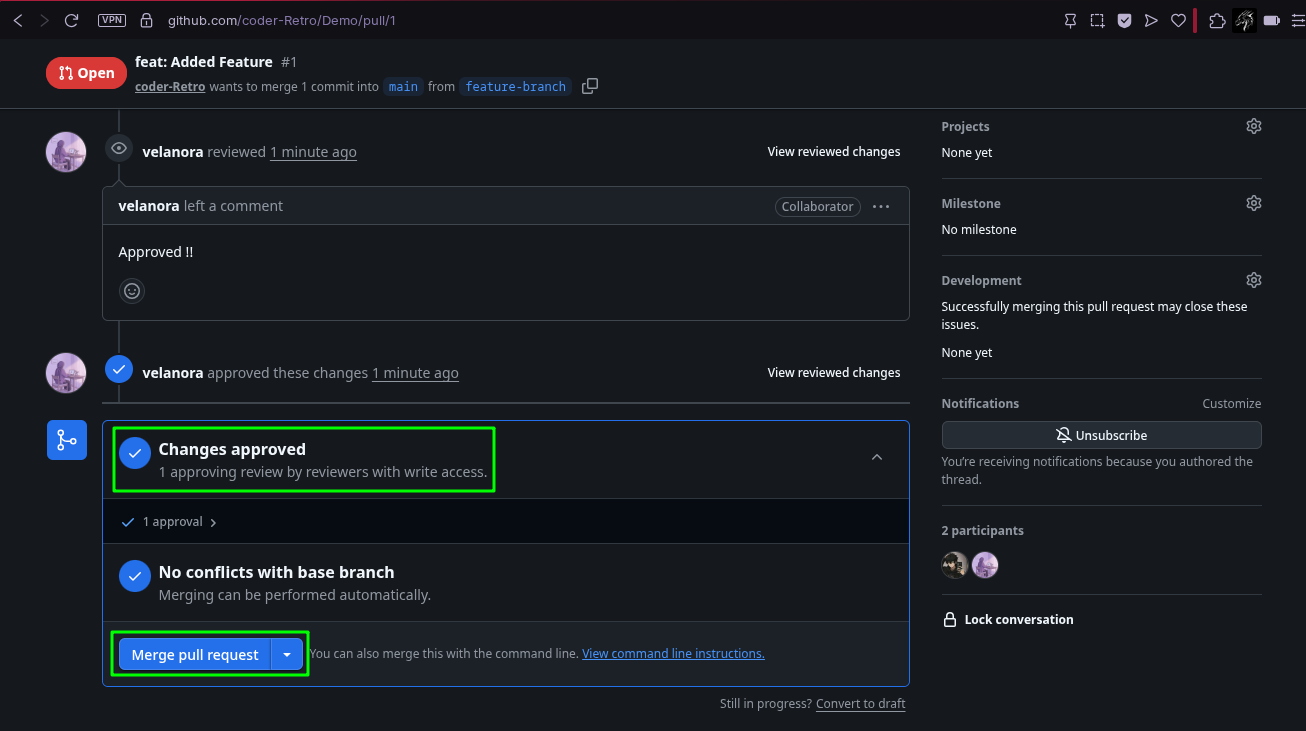
Now let's merge our PR by clicking on the "Merge Pull Request" button at the bottom, a dialogue box will appear where we have to provide a commit message, a description if we want and finally click the "Merge Pull Request" button like this one:
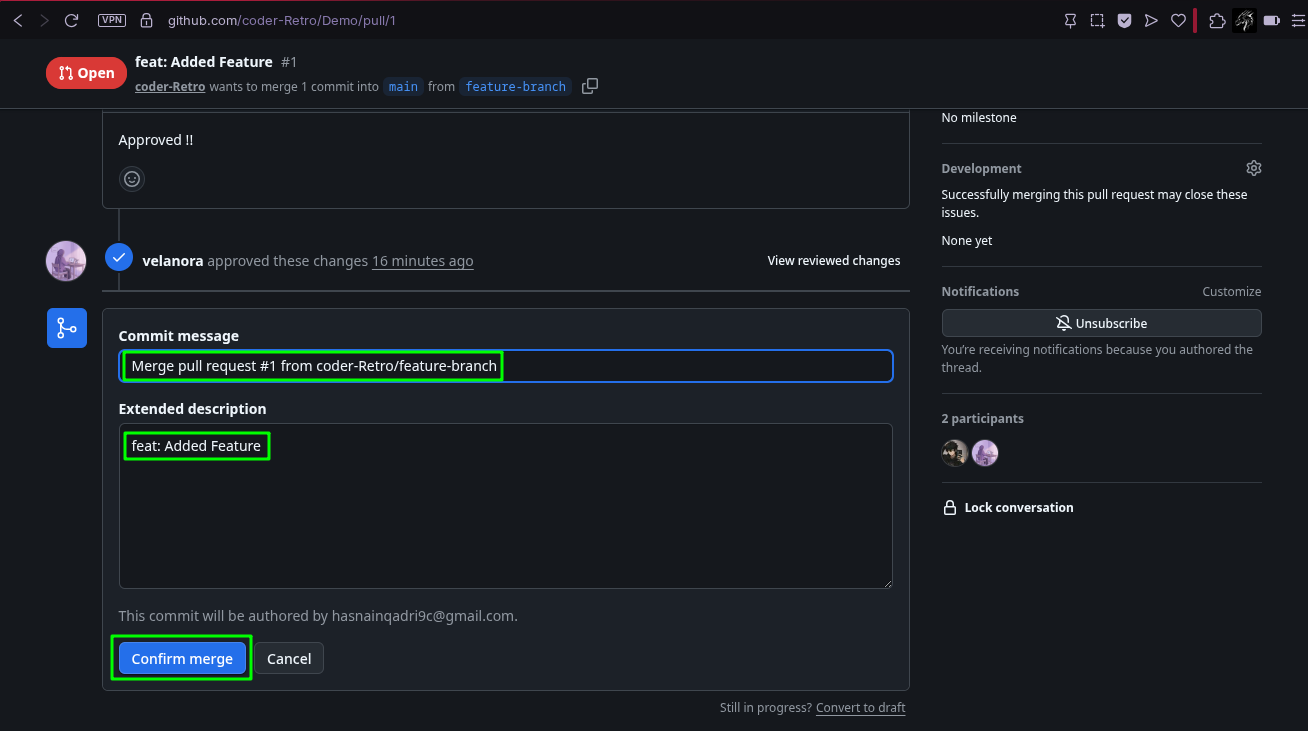
Then finally our PR will be merged into main and you will see this appear at the bottom of your PR:
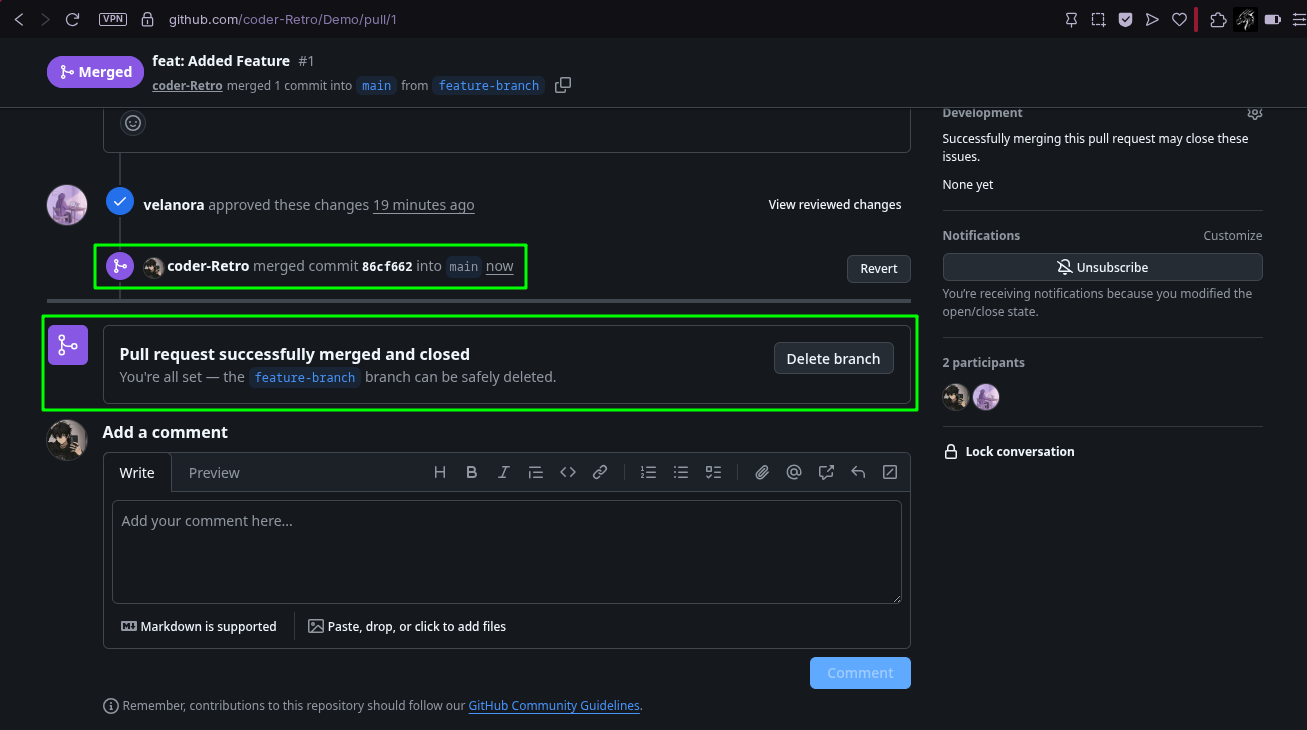
Now it is a convention to delete a branch after it has merged into main and completed the task it was supposed to do, but before deleting it let's see that our changes have safely merged into our main branch by going to main branch on GitHub.
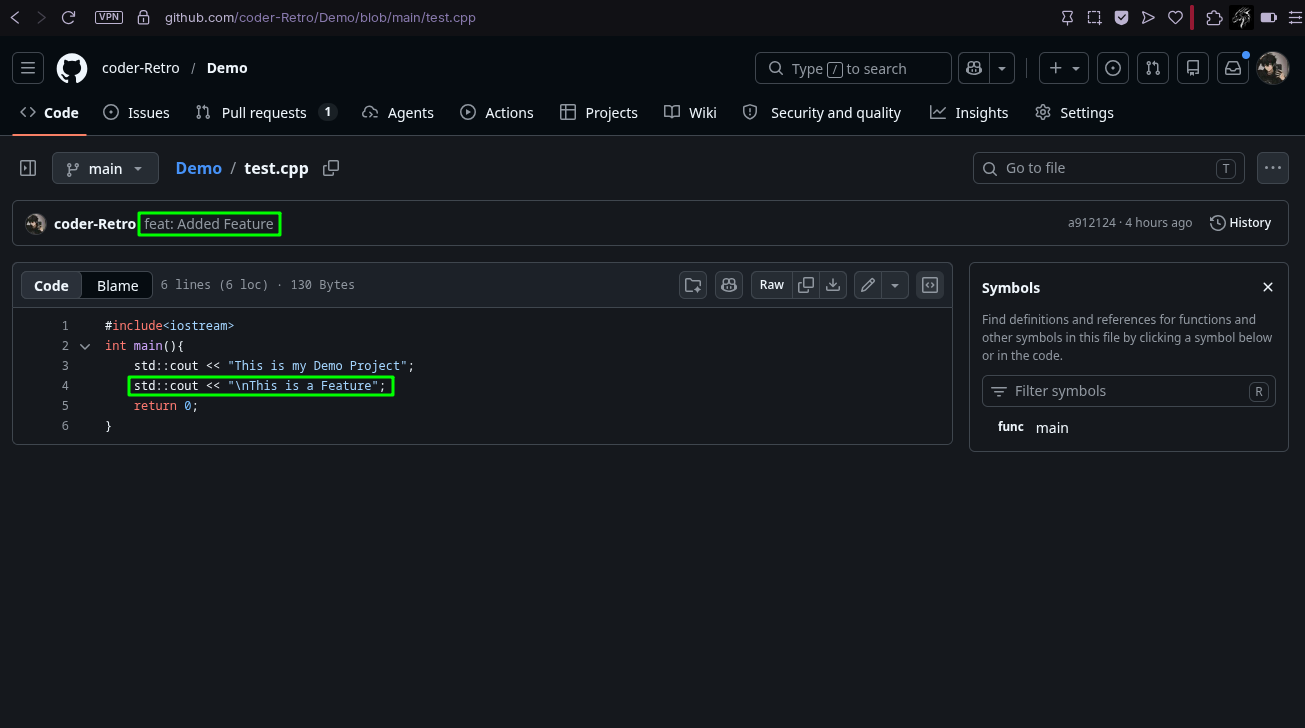
Delete Feature Branch
#As we can see that our main has successfully been updated and now we can safely delete our feature branch using the command line in our terminal. We will need the following commands:
git switch main
git pull origin main
git branch -d feature-branch
git push origin -d feature-branch
The first command will switch us to main because in order to delete a branch, we need to move to another branch as git does not allow you to delete your currently active branch. So first command will switch us to main. Then second command will update your local’s main to remote’s main (updated after merge). Then third command will delete our feature branch in our local repo. And finally fourth command will delete our feature branch from our remote repo on GitHub. You can verify the deletion of your local repo’s feature branch by running:
You will see that your feature branch is deleted in your local repo. Similarly you can verify the deletion of your remote feature branch by going to the branch switch menu of your repo on GitHub:
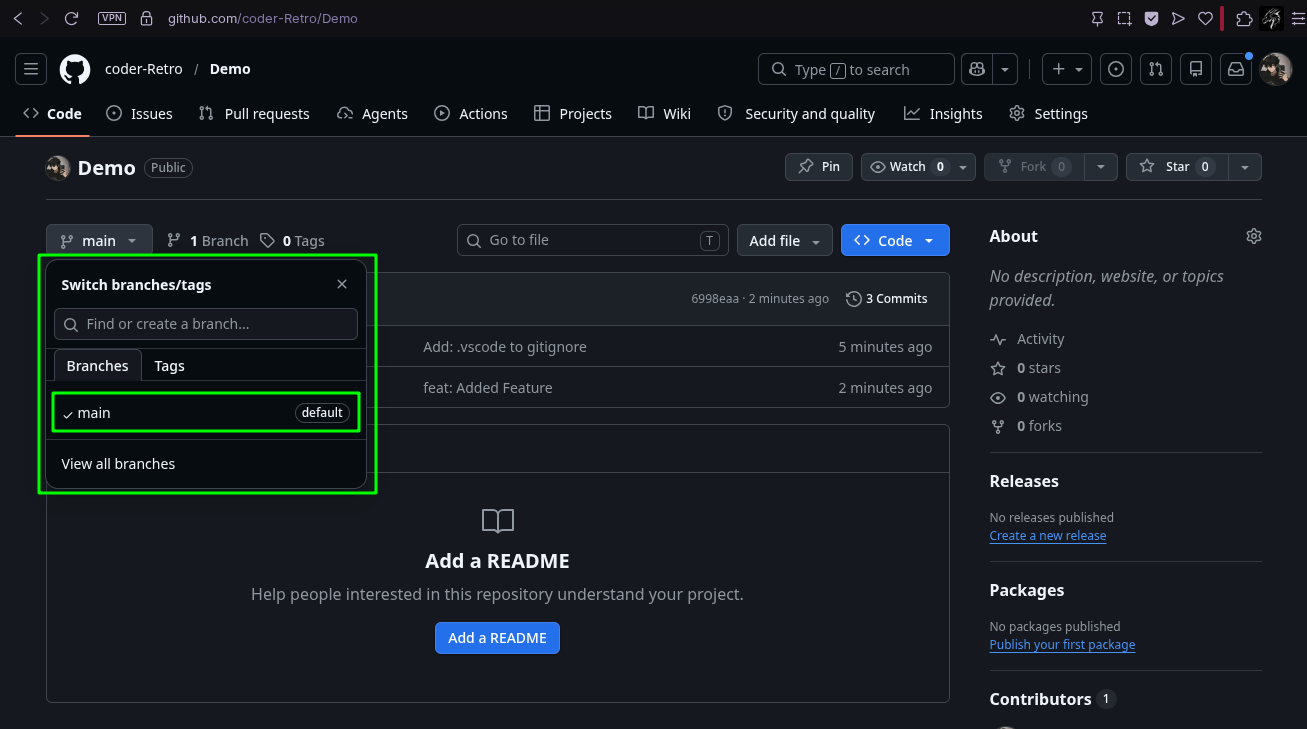
Congratulations! you have learnt how to create a feature branch, add a feature to your project, merge your branch using either git commands on your personal solo repo and by opening a PR on a collaborative repo. Then you also learnt how to delete your feature branch. Now you should take a break and practice all these concepts to let them sink in.
Clone Repo
#Now that we know how to make a repo from scratch, let's try working on a GitHub repo that we find amusing due to any certain reason. This is called cloning. For this, we need to clone the repo, how to do that ? First go to the location in your system where you want to save it. Then run the following command:
You can find the repo’s URL on GitHub in the blue/green “Code Menu” when you open that repo, for example let’s say we want to clone the Demo Repo we have been working on, then we would copy the given URL from the Repo on GitHub and replace the “TargetRepoURL” with it:
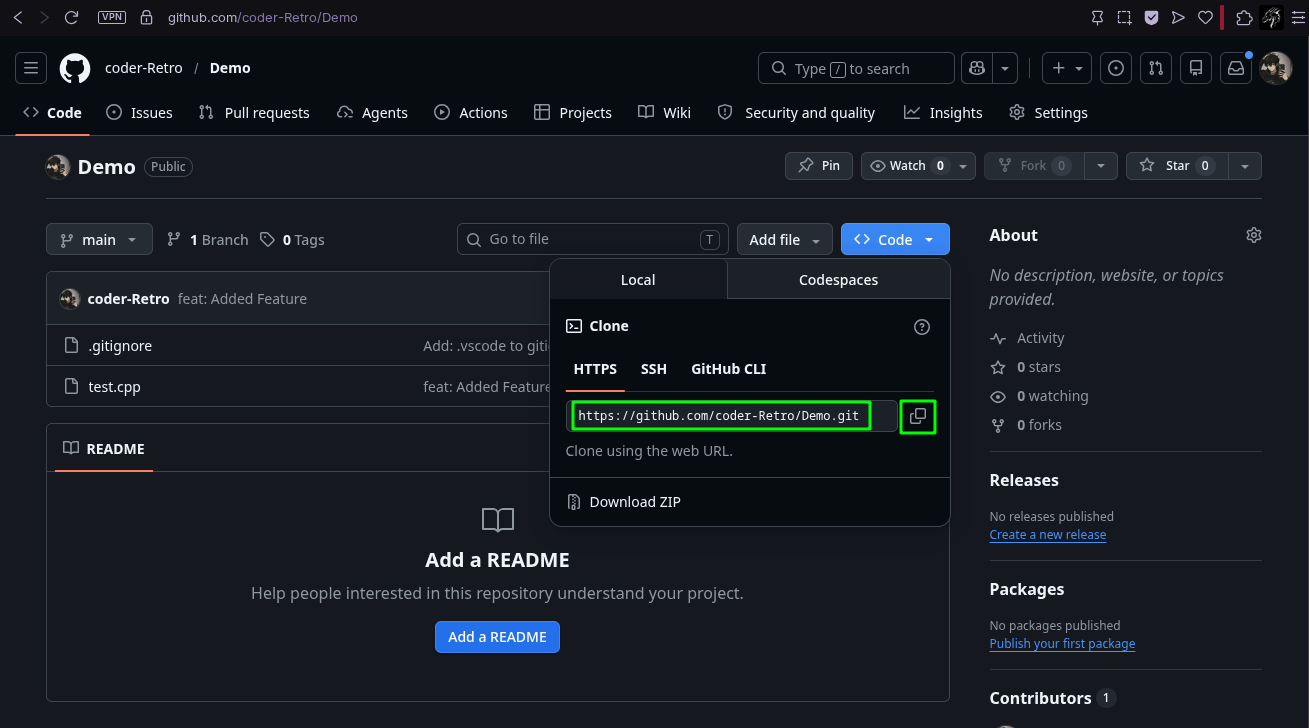
This command would clone the repo and then you can enter the local clone repo using:
However, do know that the repo might be owned by someone else and they might not have given you the rights to push anything to the remote repo like a collaborator could do. So you can play around with the local repo, but not the remote version of this cloned repo. Other than that, making branches and merging into main in your local repo is all the same as studied before. So now you know how to make a repo from scratch as well as how to clone a built one. Now we can move onto the actual core concepts of git and GitHub, basically the version control part of it, that allows us to track the changes made to files in our project and also to load old checkpoints if needed.
Basic Version Control
#Version control as discussed before, allows us to go to different points in the history of our project's evolution. How to do this now. Let's say that we want to remove the feature that we added using our feature branch into test.cpp. We can use version control capability of git to revert the commit in which we added the feature. Let's learn how to do this. For this, we will need the commit hash of that version. How to find that ? We run a simple command:
You will see the history of all the commits made to the project. My Demo Repo’s History looks like this right now:
commit 6998eaa85661853059f2bd76249662a63df64ce8
(HEAD -> main, origin/main, origin/HEAD)

Author: coder-Retro <hasnainqadri9c@gmail.com>
Date:   Sun Jun 14 18:14:56 2026 +0500

    feat: Added Feature

commit a502c4a53ae37f001db0555b325fd3339f5db4bf
Author: coder-Retro <hasnainqadri9c@gmail.com>
Date:   Sun Jun 14 18:12:00 2026 +0500

    Add: .vscode to gitignore

commit 08964f140eee9b70a2f462094fd5947eb933d820
Author: coder-Retro <hasnainqadri9c@gmail.com>
Date:   Sun Jun 14 18:07:58 2026 +0500

    Any Message
If you want to start reading the commit history from the beginning of the project, then read the git log’s output from bottom to upwards. As you can see here that there are only three commits. Initial commit that we made through our main branch (Any Message), second commit where we added the gitignore and the third commit that we made through our feature branch (feat: Added Feature). Git log also tells us the time those commits were made along with the attached commit message. Now back to commit hash that we needed. You see the first line of each commit that says “commit” and then a long code after it, this long code is called the “Commit Hash”.
Revert Commit
#In order to revert our feature commit, we need its commit hash. We can look at the commit messages to know where we want to go. The last commit says "feat: Added Feature", so that's the one we need to revert. Let's copy the commit hash of this commit. Now in order to remove a feature, we must make a new branch like we made one to add it. Let's revise the branch making process shall we? First sync your local main with remote main using:
git switch main
git pull origin main
Then make a branch using the branch creation command and also switch to it. Let’s call this branch “remove-feature”:
git switch -c remove-feature
Now let’s run branch list command to make sure that our branch has been created and we are on the current branch:
It should look something like this:
Not let’s use our copied commit hash to revert the feature. For this, we need to run this command using our commit hash:
git revert --no-edit 6998eaa85661853059f2bd76249662a63df64ce8
git push origin remove-feature
Normally “git revert CommitHash” would have also worked, but sometime you will get an error regarding an editor called “vi” which might not be installed in your system, so to bypass that error we use the “no-edit” flag. Now the test.cpp in the remove-feature branch of our repo has been restored to its original form where the feature did not exist.
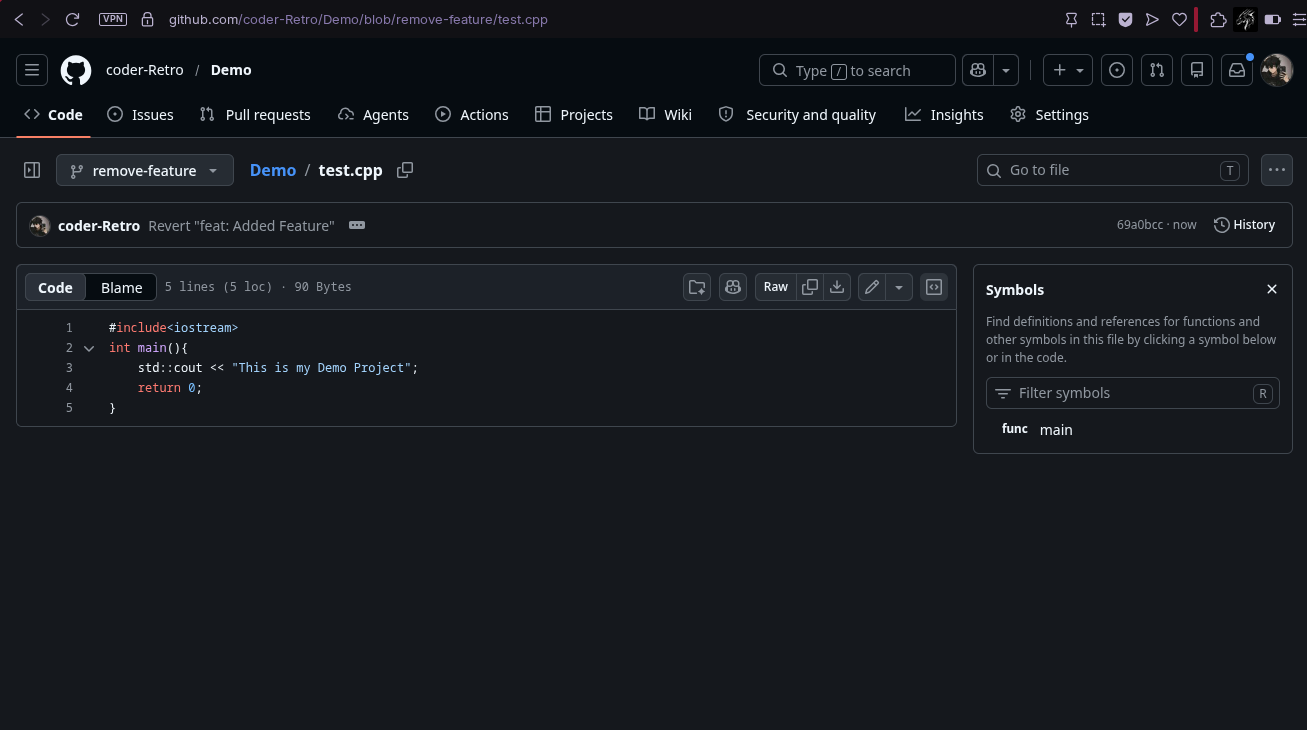
Now let's merge our remove-feature into our main to restore the original code as well:
git switch main
git merge remove-feature
git push origin main
The first command will switch to main branch in local repo, the second command will merge the remove-feature of local repo into main branch of local repo and finally third command will update the code on remote repo’s main branch using the local repo’s main. Now let’s run git log to verify if our feature has been removed, you will see this:
commit 69a0bcc56c2173ab9e01ad92fcc1fe7f872adb3d
Author: coder-Retro <hasnainqadri9c@gmail.com>
Date:   Sun Jun 14 21:53:54 2026 +0500

    Revert "feat: Added Feature"

    This reverts commit 6998eaa85661853059f2bd76249662a63df64ce8.

commit 6998eaa85661853059f2bd76249662a63df64ce8
Author: coder-Retro <hasnainqadri9c@gmail.com>
Date:   Sun Jun 14 18:14:56 2026 +0500

    feat: Added Feature

commit a502c4a53ae37f001db0555b325fd3339f5db4bf
Author: coder-Retro <hasnainqadri9c@gmail.com>
Date:   Sun Jun 14 18:12:00 2026 +0500

    Add: .vscode to gitignore

commit 08964f140eee9b70a2f462094fd5947eb933d820
Author: coder-Retro <hasnainqadri9c@gmail.com>
Date:   Sun Jun 14 18:07:58 2026 +0500

    Any Message
As you can see that the latest commit says (Revert “feat: Added Feature”). You can also verify the feature removal by going to remote repo’s main:
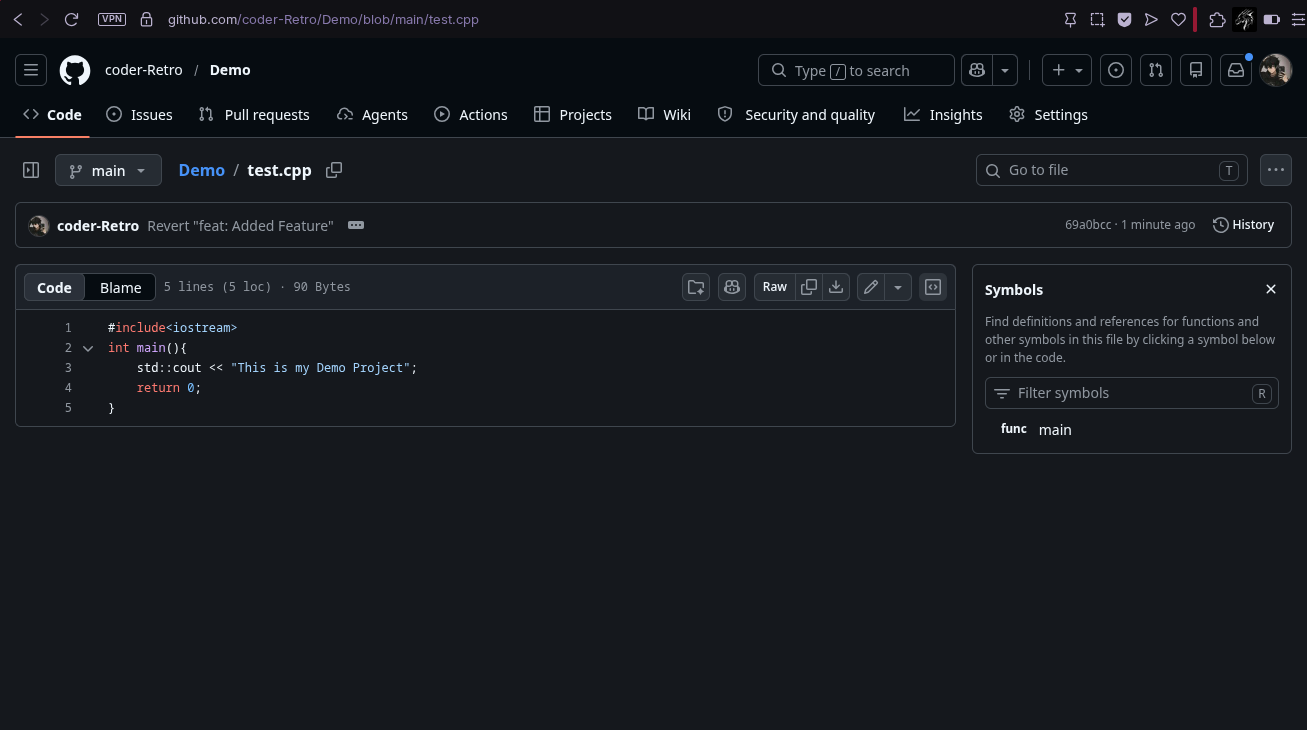
Cleanup
#As we can see that our feature has been reverted all over our project and initial form of code has been restored. Now all we have left to do is to delete our remove-feature branch to cleanup. Let's revise the branch deletion process by running the following commands:
git switch main
git pull origin main
git branch -d remove-feature
git push origin -d remove-feature
We already know what each of these commands do step by step. Congratulations on reverting your feature and restoring an older version of your project. This is one of the most important and amazing powers a developer can desire to have and that is exactly what git and GitHub deliver.
Advanced Version Control
#That was not much to revert a single commit and restore the code. However, let's learn how to undo multiple commits that were made after a certain point. For this, we will add 3 features using 3 branches. We will use separate names for these branches (i.e feature-1, feature-2 and feature-3). Then we will restore the code to the point where only the feature of feature-1 was added and remove features added by feature-2 and feature-3. Let's make these branches and add the features first.
git switch main
git pull origin main
git switch -c feature-1
Then add the feature in your cpp using feature-1:
#include<iostream>
int main(){
    std::cout << "This is my Demo Project";
    std::cout << "\nThis is Feature 1";
    return 0;
}
Now save it, push it onto remote’s feature-1, then merge it into main and delete your feature-1 using:
git add test.cpp
git commit -m "Add: First Feature"
git push origin feature-1
git switch main
git merge feature-1
git push origin main
git branch -d feature-1
git push origin -d feature-1
By now, first feature has been added and feature-1 has been deleted from local and remote repo. Let’s add second feature by making feature-2 branch. Now since we are already on main and we know that our local’s main is updated with remote’s main, we will skip the “git switch main” and “git pull origin main” command. This is important to know which command does what and whether we need to run it or not:
Then add the second feature to your test.cpp like:
#include<iostream>
int main(){
    std::cout << "This is my Demo Project";
    std::cout << "\nThis is Feature 1";
    std::cout << "\nThis is Feature 2";
    return 0;
}
Now save test.cpp and repeat the same push and merge process for feature-2 as well:
git add test.cpp
git commit -m "Add: Second Feature"
git push origin feature-2
git switch main
git merge feature-2
git branch -d feature-2
git push origin -d feature-2
I have demonstrated the process two times for First and Second feature. Now add the Third Feature using feature-3 branch yourself. By the end, we will be on our main branch, all feature branches will be deleted and your test.cpp will look like this:
#include<iostream>
int main(){
    std::cout << "This is my Demo Project";
    std::cout << "\nThis is Feature 1";
    std::cout << "\nThis is Feature 2";
    std::cout << "\nThis is Feature 3";
    return 0;
}
So we added three features using 3 feature branches, now we need to learn how to remove everything added to our project ahead of a certain point. For now, let’s set this point as First Feature, which means that we will restore the project to the point where First Feature was added and anything added after that (Second Feature and Third Feature) will be removed. This is gonna be different than reverting, where reverting only undid a single commit, this will undo all the commits made after “Add: First Feature”, therefore the successive “Add: Second Feature” & “Add: Third Feature” commits will be undone. Let’s get down to it then.
Retrieve CommitHash
#In order to restore our project to a certain point, we will need the commit hash of that point. We already know how we can get the commit hash using git log. Now since we need the commit hash of First Feature, we will need to search for the First Feature commit in the git log's history. But since we have been using clean commit messages for each commit, we will be able to locate First Feature's commit in no time. Let's open the project's commit history using:
And we will be greeted with the history of commits of our project. Let’s look for the First Feature commit by searching through the commits using commit messages as a key. We are looking for a message that says “Add: First Feature”.
commit f3e2cd94b60ff4845dd3c80851a0f2ce6f6dd55f
(HEAD -> main, origin/main, origin/HEAD)
Author: coder-Retro <hasnainqadri9c@gmail.com>
Date:   Tue Jun 16 19:33:09 2026 +0500

    Add: Third Feature

commit a65d42aad6606b6c8aaae3d649ec45735f76ad4c
Author: coder-Retro <hasnainqadri9c@gmail.com>
Date:   Tue Jun 16 19:31:42 2026 +0500

    Add: Second Feature

commit fe312a3b08b8d16a3ac6a110a987d8a0ef307a0c
Author: coder-Retro <hasnainqadri9c@gmail.com>
Date:   Tue Jun 16 19:29:53 2026 +0500

    Add: First Feature

commit 69a0bcc56c2173ab9e01ad92fcc1fe7f872adb3d
Author: coder-Retro <hasnainqadri9c@gmail.com>
Date:   Sun Jun 14 21:53:54 2026 +0500

    Revert "feat: Added Feature"

    This reverts commit 6998eaa85661853059f2bd76249662a63df64ce8.

commit 6998eaa85661853059f2bd76249662a63df64ce8
Author: coder-Retro <hasnainqadri9c@gmail.com>
Date:   Sun Jun 14 18:14:56 2026 +0500

    feat: Added Feature

commit a502c4a53ae37f001db0555b325fd3339f5db4bf
Author: coder-Retro <hasnainqadri9c@gmail.com>
Date:   Sun Jun 14 18:12:00 2026 +0500

    Add: .vscode to gitignore

commit 08964f140eee9b70a2f462094fd5947eb933d820
Author: coder-Retro <hasnainqadri9c@gmail.com>
Date:   Sun Jun 14 18:07:58 2026 +0500

    Any Message
There it is, the commit message “Add: First Feature”. We will now copy its commit hash. Now after that, we need to start restoration to this commit hash.
Restoration
#Now let's make another branch to start our retoration safely, let's name this branch as "restore-branch":
git switch -c restore-branch
Now we have to restore our project for First Feature on this branch and then update main branch using this branch as reference. We can do this by first restoring the code on our restore-branch by using the following command with First Feature’s commit hash:
Data Loss: The upcoming command contains a “hard” flag, which is a destructive flag. It completely wipes out files in your local directory and also wipes the git log history of the successive commits. Make sure you don’t have uncommitted code that you don’t want to lose before running this next command!
git reset --hard fe312a3b08b8d16a3ac6a110a987d8a0ef307a0c
What this will do? this will bring the test.cpp on your restore-branch to the exact state as when First Feature was added, “hard” flag is the thing responsible for restoring the physical file to this point, if you use “soft” flag then your file would be staged as First Feature commit, but the physical code would not have been lost in your code editor. Anyways, “hard” resets the file to that commit. You can verify this by the absence of Second and Third Features in your test.cpp file in your code editor. Now we just need to update main using this restore-branch. We can do that by running the following commands:
History Rewriting: The upcoming commands contain a “force” flag which is capable of altering the remote repo’s history of commits made in the project, so before using this flag make sure that you don’t lose any neccessary data in your project’s history log which might be needed later. In a professional repo with a team, force-pushing to a shared tracking branch like main is usually strictly forbidden because it can disrupt your team’s local environments. Only use it on your personal or isolated feature branches!
git push origin restore-branch --force
git switch main
git reset --hard restore-branch
git push origin main --force
The first command, you already know what it does but that “force” flag is new for you right? Well GitHub has a simple rule called the forward-movement principle. It only expects the user to move forward by keeping all the previous commits and adding new ones ahead of it. But here, we just restored the restore-branch to an older commit which removed the successive commits (Second Feature & Third Feature), now if we push to GitHub, this will be a backward-movement which GitHub sees as a mistake by the user. So by adding “force” flag, we are telling GitHub that “I know what I am doing so just listen to me and do it”. This allows GitHub to know that this backward-movement is intentional and not a mistake so GitHub breaks its forward-movement principle and allows us to go back to an old point and remove the successive commits ahead of that point. It will also remove the Second Feature and Third Feature’s commits from our project’s git log history as well. That’s what the “force” flag does. The second command then switches to main as you know already. The third command updated the local’s main to local’s restore branch. The fourth command then updates remote’s main using local’s main, and “force” flag is again used for the same reason here. Now let’s run git log to check the history:
commit fe312a3b08b8d16a3ac6a110a987d8a0ef307a0c
Author: coder-Retro <hasnainqadri9c@gmail.com>
Date:   Tue Jun 16 19:29:53 2026 +0500

    Add: First Feature

commit 69a0bcc56c2173ab9e01ad92fcc1fe7f872adb3d
Author: coder-Retro <hasnainqadri9c@gmail.com>
Date:   Sun Jun 14 21:53:54 2026 +0500

    Revert "feat: Added Feature"

    This reverts commit 6998eaa85661853059f2bd76249662a63df64ce8.

commit 6998eaa85661853059f2bd76249662a63df64ce8
Author: coder-Retro <hasnainqadri9c@gmail.com>
Date:   Sun Jun 14 18:14:56 2026 +0500

    feat: Added Feature

commit a502c4a53ae37f001db0555b325fd3339f5db4bf
Author: coder-Retro <hasnainqadri9c@gmail.com>
Date:   Sun Jun 14 18:12:00 2026 +0500

    Add: .vscode to gitignore

commit 08964f140eee9b70a2f462094fd5947eb933d820
Author: coder-Retro <hasnainqadri9c@gmail.com>
Date:   Sun Jun 14 18:07:58 2026 +0500

    Any Message
As you can see, latest commit is First Feature now and successive commits have been removed. You can also verify the change in you remote repo’s main.
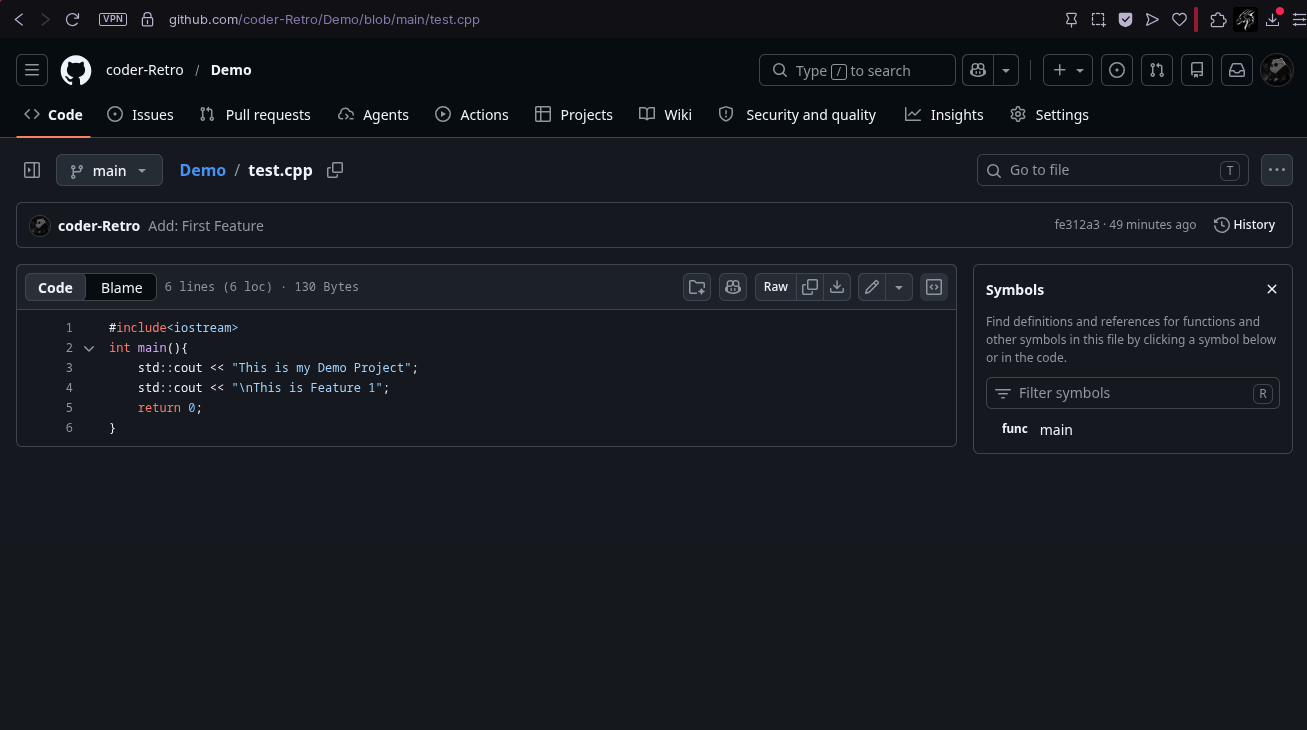
Cleanup
#Now that we have verified the restoration, let's perform the cleanup by deleting our restore branch from both local and remote repo. Again, I will skip the "git switch main" and "git pull origin main" because I am already on main branch so don't need to switch, and also main hasn't been changed after the last update, so we don't need to pull from remote's main:
git branch -d restore-branch
git push origin -d restore-branch
There we go, project restored to intended point and all cleaned up. Again, I would recommend to take a break here and practice what you have learnt in Basic and Advanced Version Control to get a good understanding of it. After that, we will move onto our last topic of this git & GitHub guide, which is “Merge Conflicts”.
Merge Conflict
#Let's start with the theoretical definition and reasons of merge conflict. When two branches edit the same line in the same file and the first branch merges normally, but then the second branch will face a conflict when it tries to merge, git falls into a decisive scenario regarding whose modifications to keep and whose to discard. Now git doesn't have decision making capabilties, this scenario is called a "Merge Conflict".
Resolution
#Since git or GitHub don't know what to do, they tell the human about the rising conflict and ask the human to decide which changes should be kept and which should be discarded. This is the "Manual Part" of git and GitHub where they rely on us, just like we relied on them the whole project.
Form Merge Conflict
#It's better to learn this process using the GitHub merge method instead of git method, because merge conflicts usually arise when multiple people are working together in the same file, and you don't usually have multiple people working on the same local machine, so most merge conflicts occur in a collaborative repo. For this, let's try making two branches as if it were two different users, and then edit the same line in test.cpp to give rise to a merge conflict and then we will resolve it. Let's start by making both branches:
git switch -c branch-1
git switch -c branch-2
Now if we run:
We will see something like this:
Now let’s use branch-2 to edit a line in test.cpp. Open the test.cpp and make input a line like this:
#include<iostream>
int main(){
    std::cout << "This is my Demo Project";
    std::cout << "\nThis is Feature 1";
    std::cout << "\nThis is Branch-2's edit";
    return 0;
}
Now let’s update branch-2’s remote:
git add test.cpp
git commit -m "Add: Branch-2 edited line 5"
git push origin branch-2
Now let’s switch to branch-1 and edit the same line of test.cpp using branch-1:
After this, open test.cpp and add this line:
#include<iostream>
int main(){
    std::cout << "This is my Demo Project";
    std::cout << "\nThis is Feature 1";
    std::cout << "\nThis is Branch-1's edit";
    return 0;
}
Now save the file and push it to remote branch-1:
git add test.cpp
git commit -m "Add: Branch-1 edited line 5"
git push origin branch-1
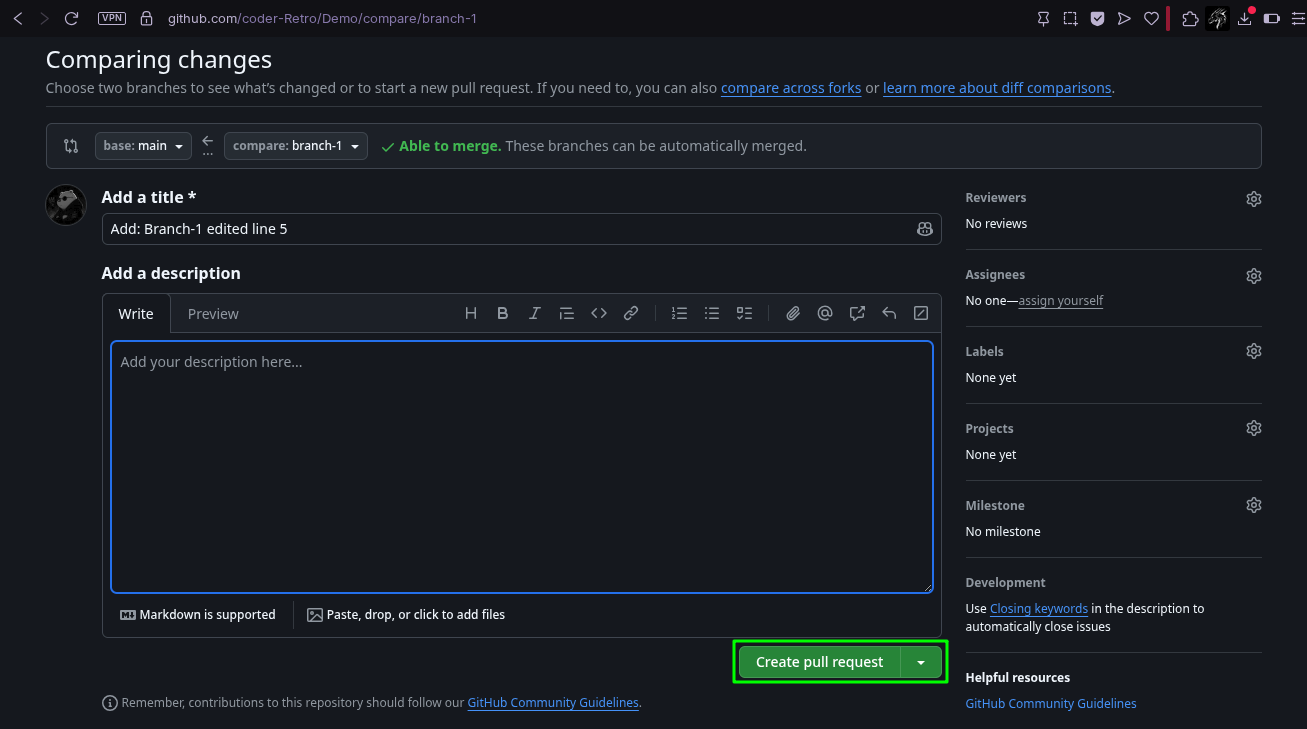
Let’s perform the merge process by first opening a PR for each branch. Let’s revise the GitHub merge method while doing this. First we need to go to GitHub. Now we will see an option for both branch’s pull request on the main page right now, if they don’t appear then we can open PR’s by going to PR tab as well. Since we have already learnt how to do that before, you can use that method as well. I will directly click the following button for now:
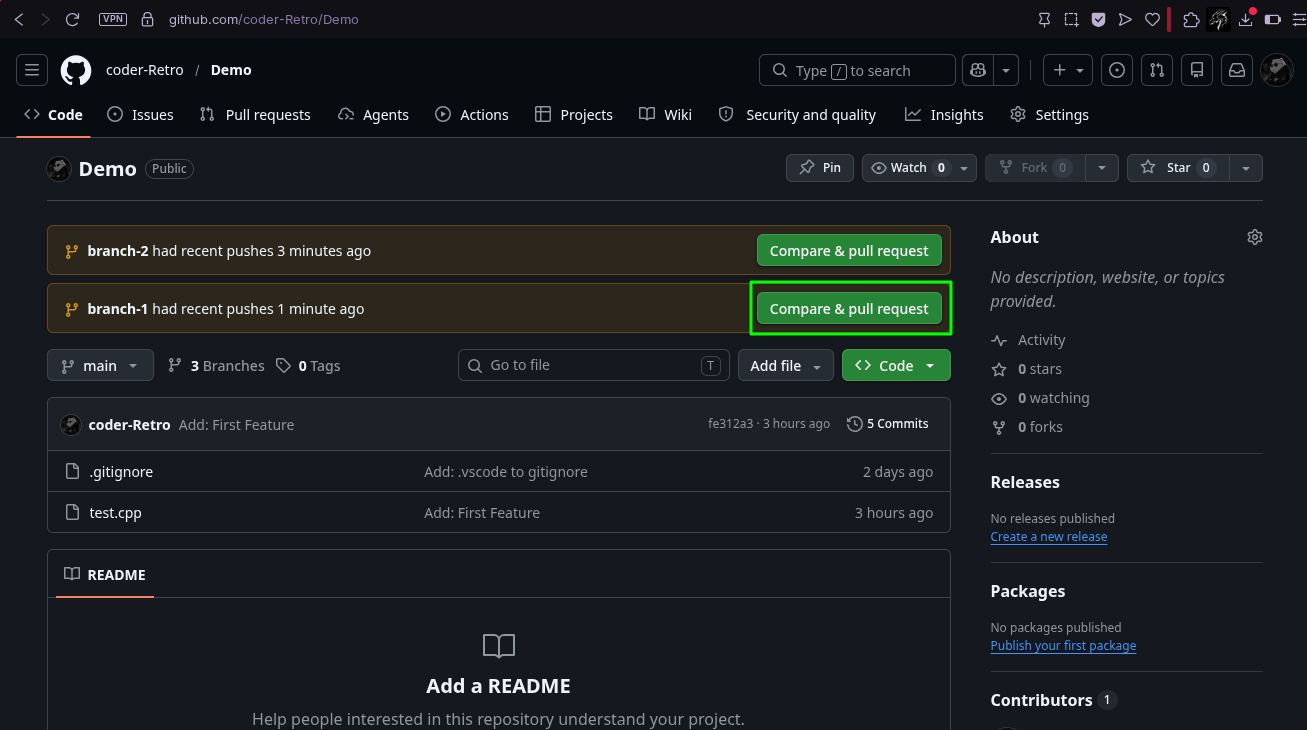
Then add a description if you want and click the "Create Pull Request" button to submit a PR for branch-1's merge and PR will be generated. You will notice that everything is normal and PR is allowed to merge withouth any problems.
Now go to main page of your repo and do the same process for branch-2's PR submission. Also, since I haven't applied any security checks in my personal repo to PRs, I am getting this dialogue box:
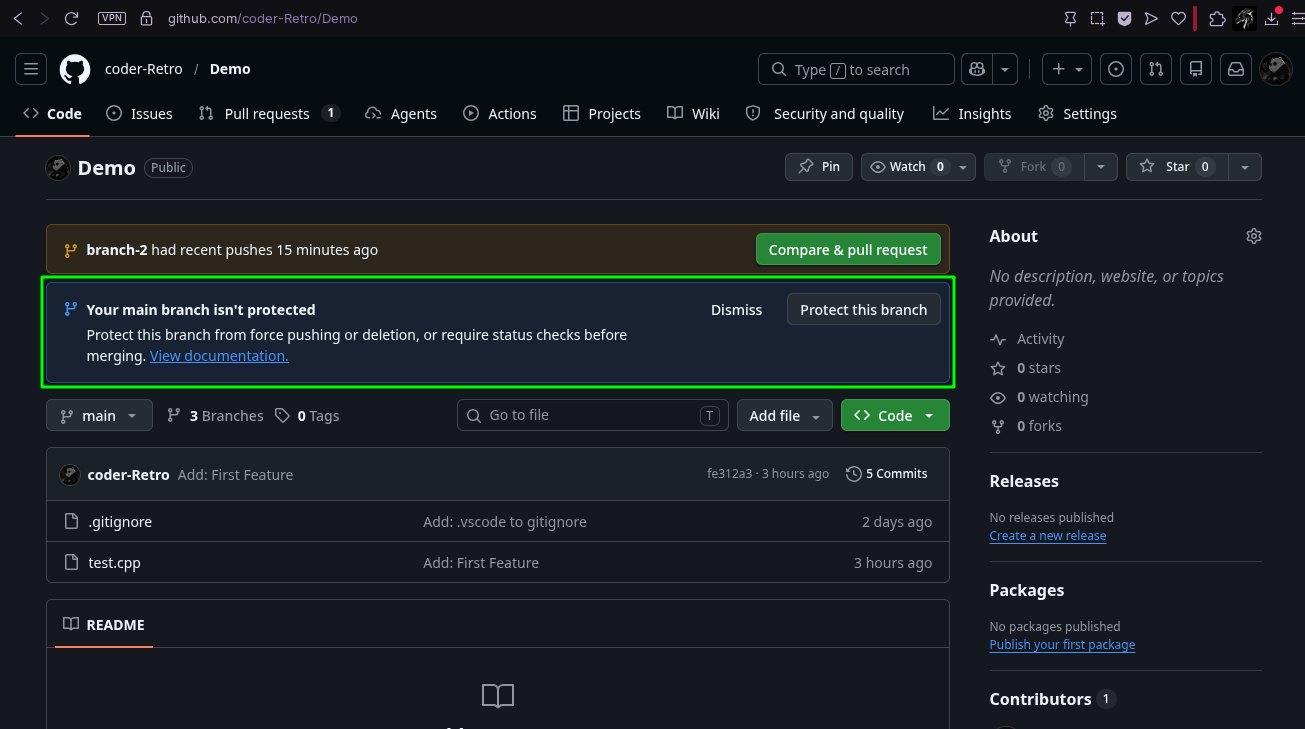
If you are getting this too in your personal repo, just ignore it right now because in a professional repo with a team, security checks will be applied and this box wont appear. For now, just perform the same PR opening process for branch-2 yourself like I did for branch-1. When you have successfully opened a PR for branch-2 just merge it right there using the Merge button at the bottom.
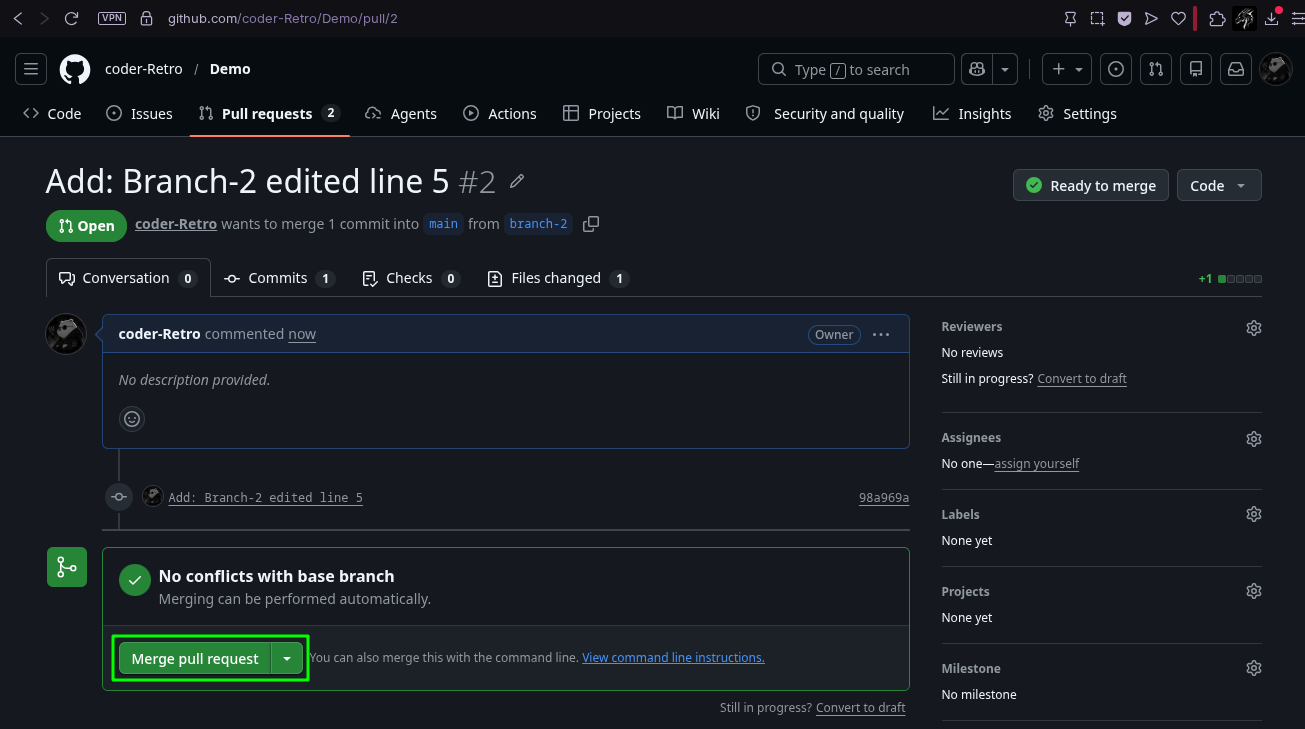
You will notice that branch-2 safely merged and everything is normal up until this point, but now if you go to PR tab and open the PR of branch-1, you will see this:
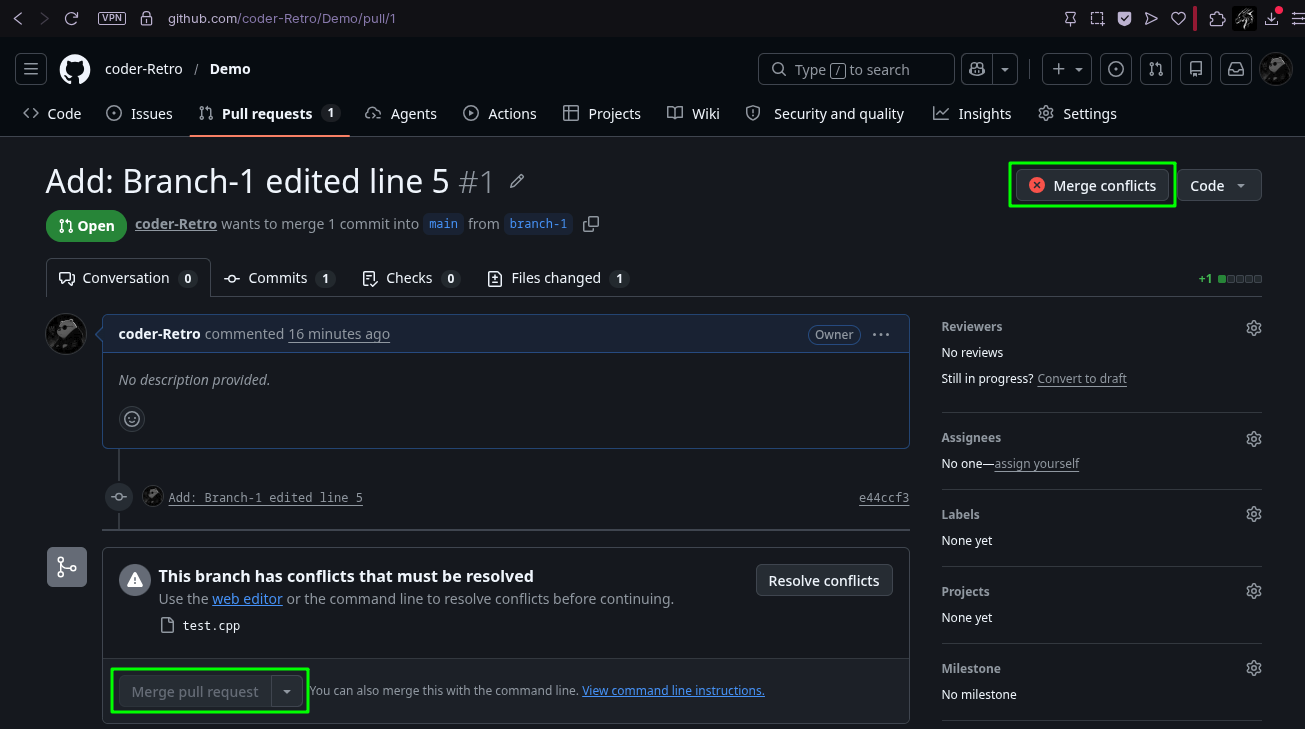
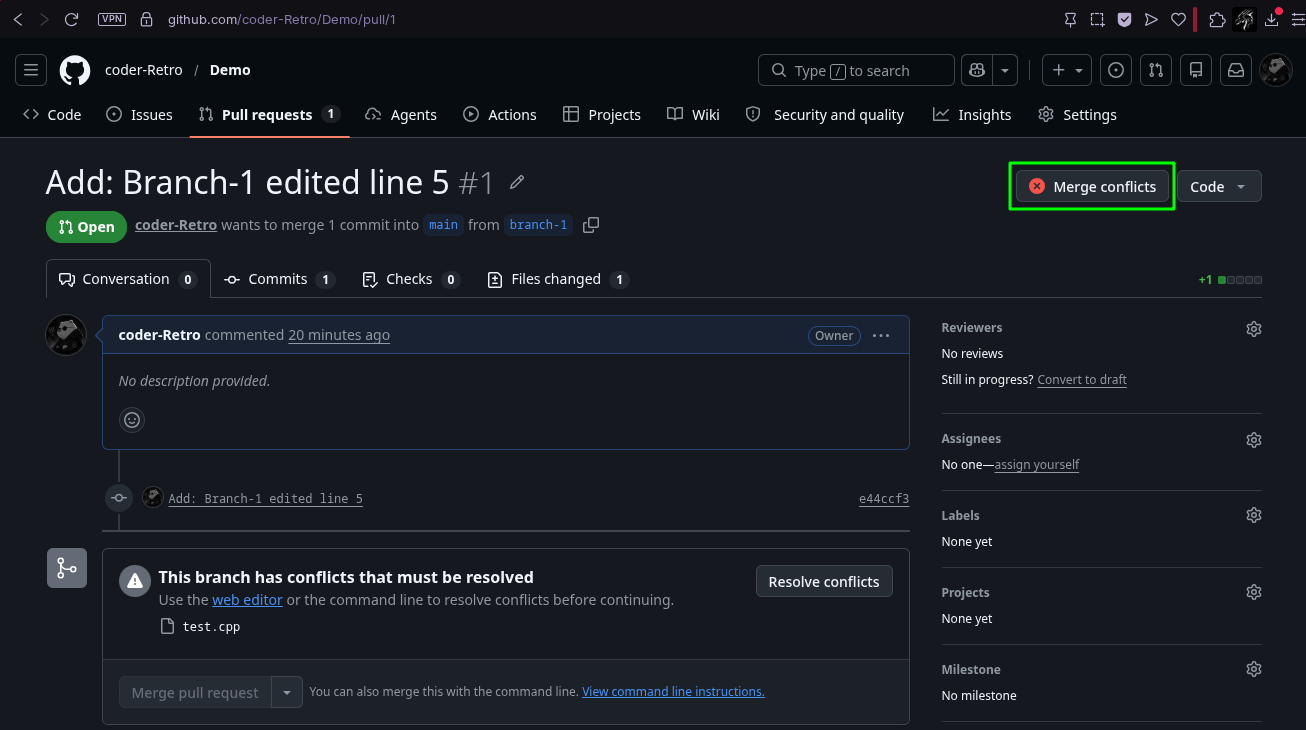
That is a "Merge Conflict", this happened because branch-2 that just merged into main, edited the same line 5 in test.cpp that our branch-1 has changed. Now GitHub is telling us about this conflict by showing us "Merge Conflict". You can also see that our merging has also been locked. Merging wont open again until merge conflict has been resolved. Let's learn how to resolve this.
Resolve Merge Conflict
#We can resolve the merge conflict directly on GitHub. Let's start. First click on this "Merge Conflicts" warning at the top right:
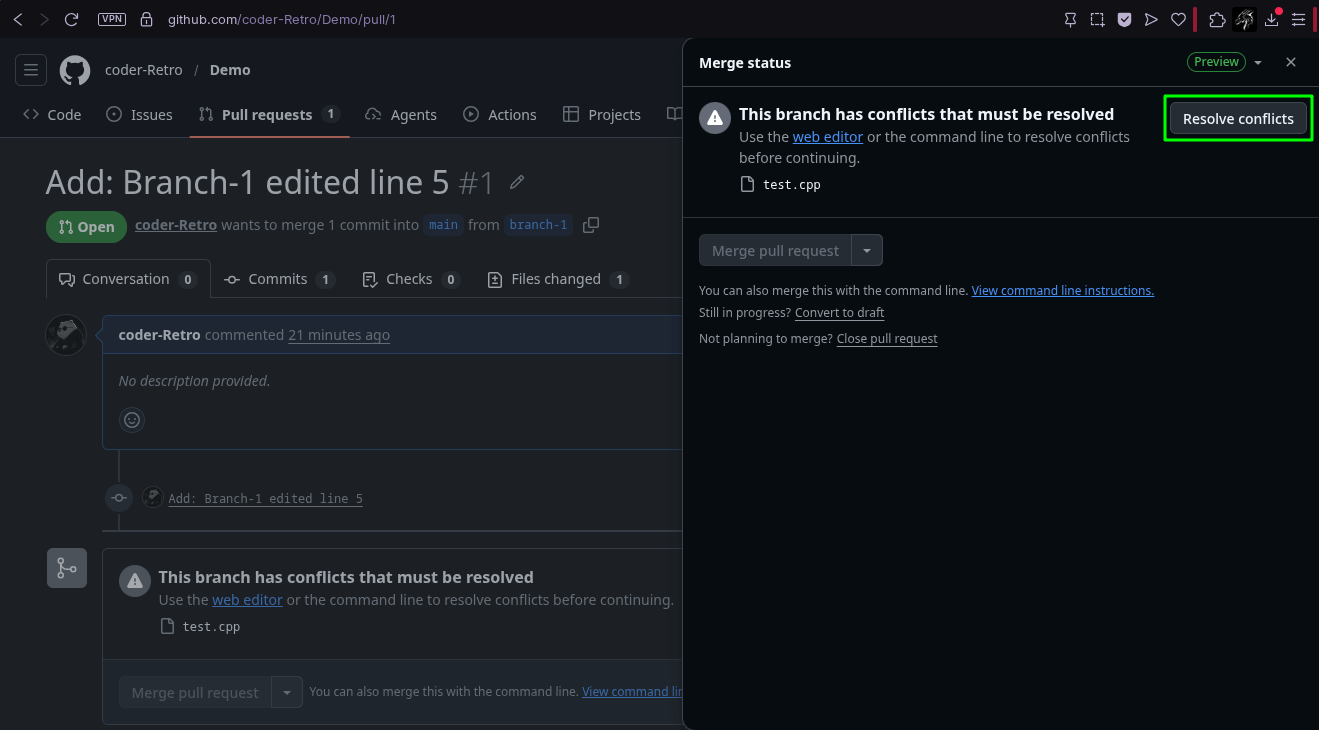
This will open this side panel in which you have to click this "Resolve Conflicts" button:
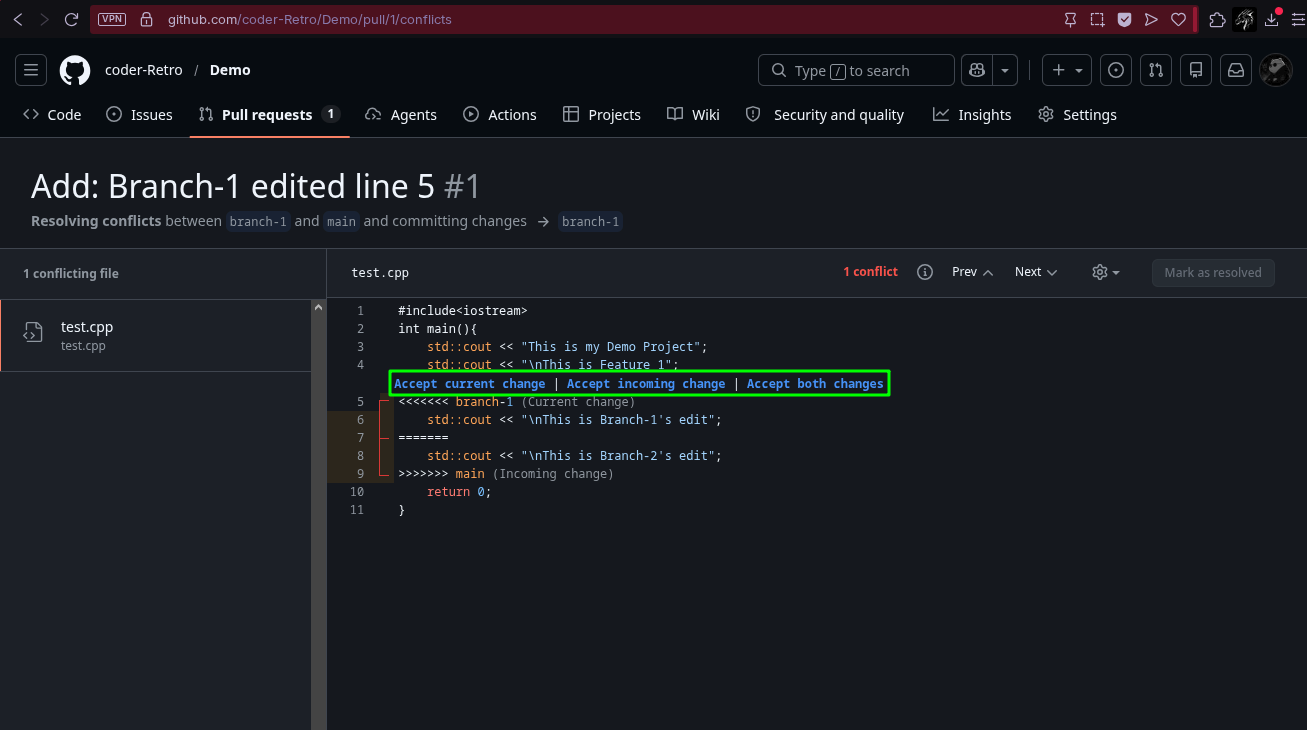
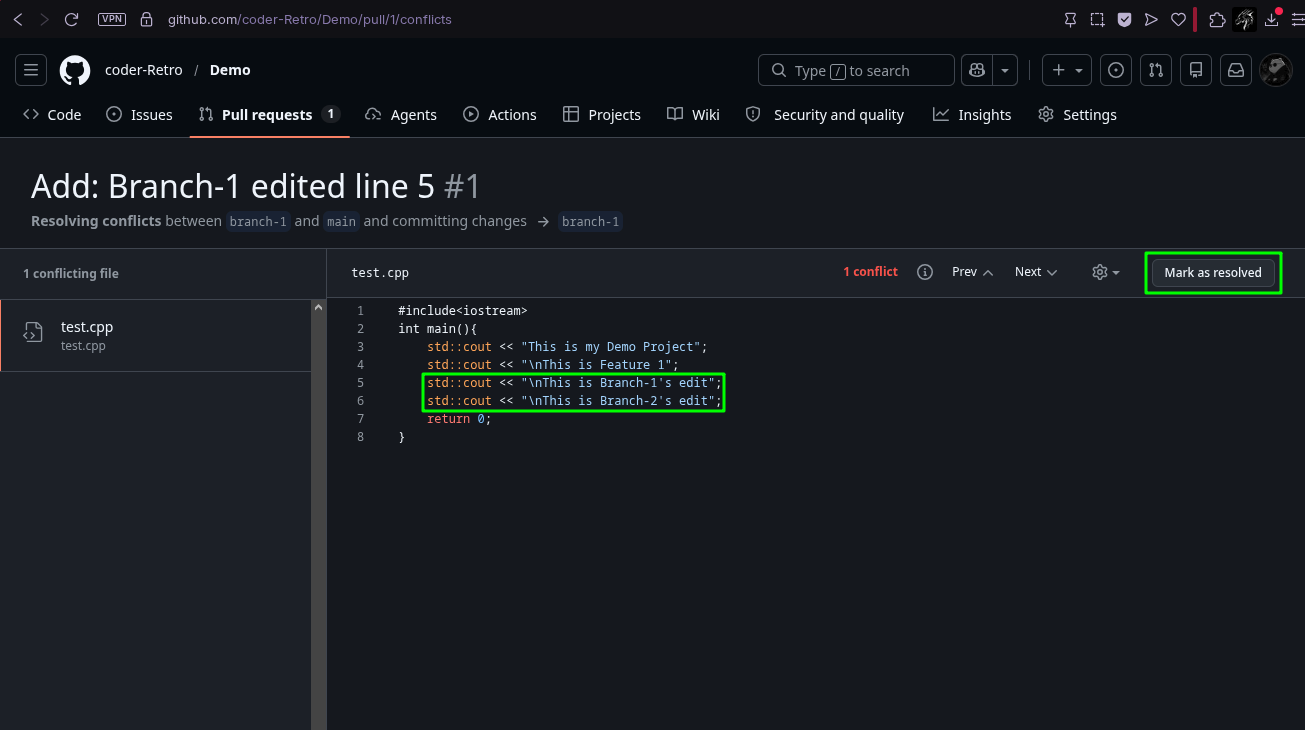
Finally you will be greeted with the file having the merge conflict, GitHub will show you the changes made by your predecessor and the changes made by you as well separately. Along with that, it will also give you the option to keep your changes and discard the predecessor's, keep predecessor's changes and discard yours, or even keep both the changes. You can select whichever is needed depending on the scenario. This is the part where team communication comes in, such a scenario shall be discussed with team and only then should such a decision be taken.
For now, I will keep both changes. For this, I will click the third option:
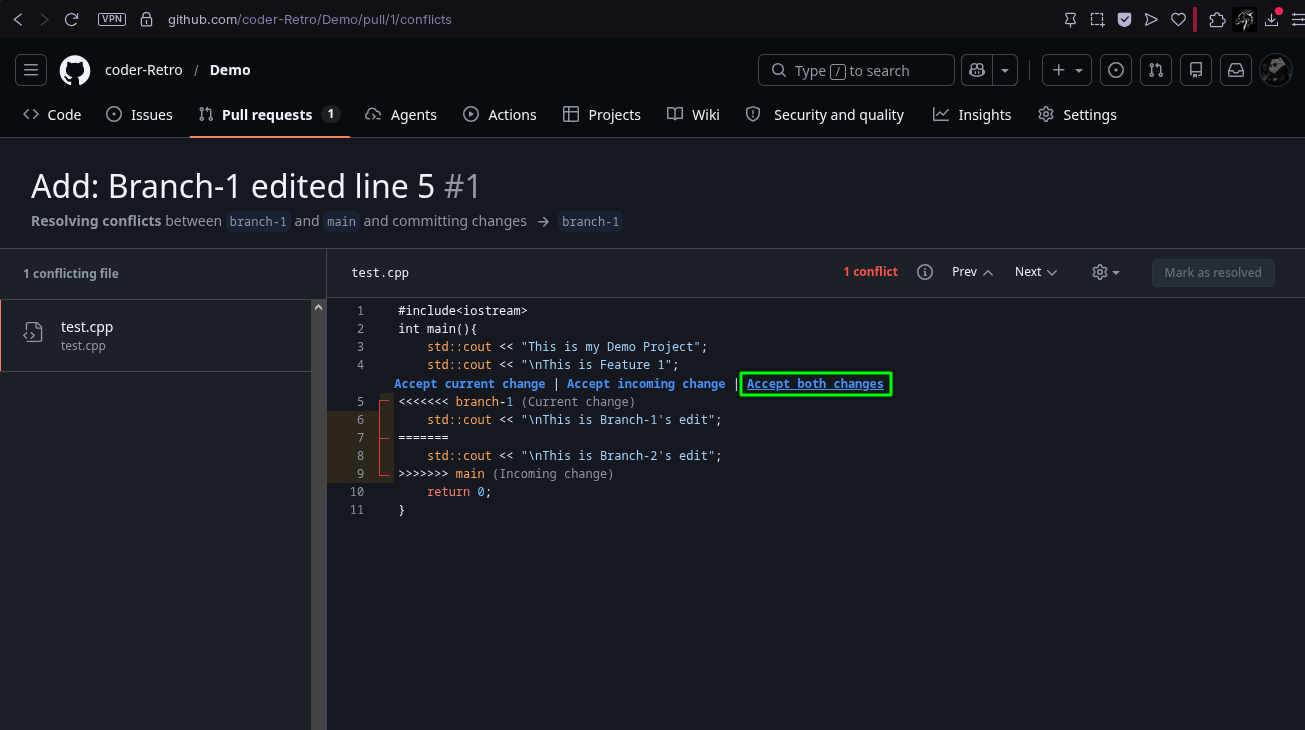
Also in the case of accepting both changes, you might notice that GitHub puts your changes first and then your predecessor's. So review the file to make sure if that is the order your file requires. In a code file, an error in the sequence of the statements can cause unwanted behaviour. So double check the sequence and then click the "Mark as resolved" button at the top right:
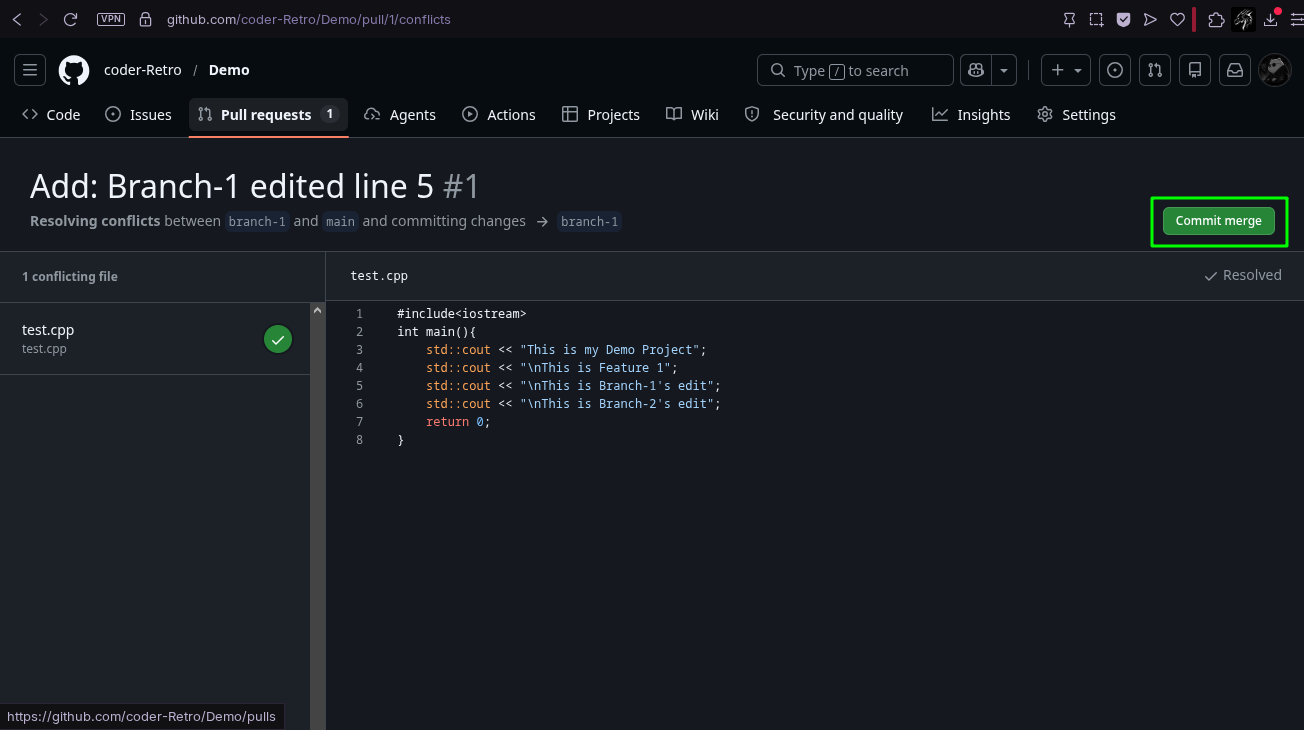
Then you have to click the "Commit Merge" button to update your PR:
You will now see that your PR doesn't have the merge conflict warning anymore and it says ready to merge, and if have attained the number of required reviews then your merge option shall also be unlocked now:
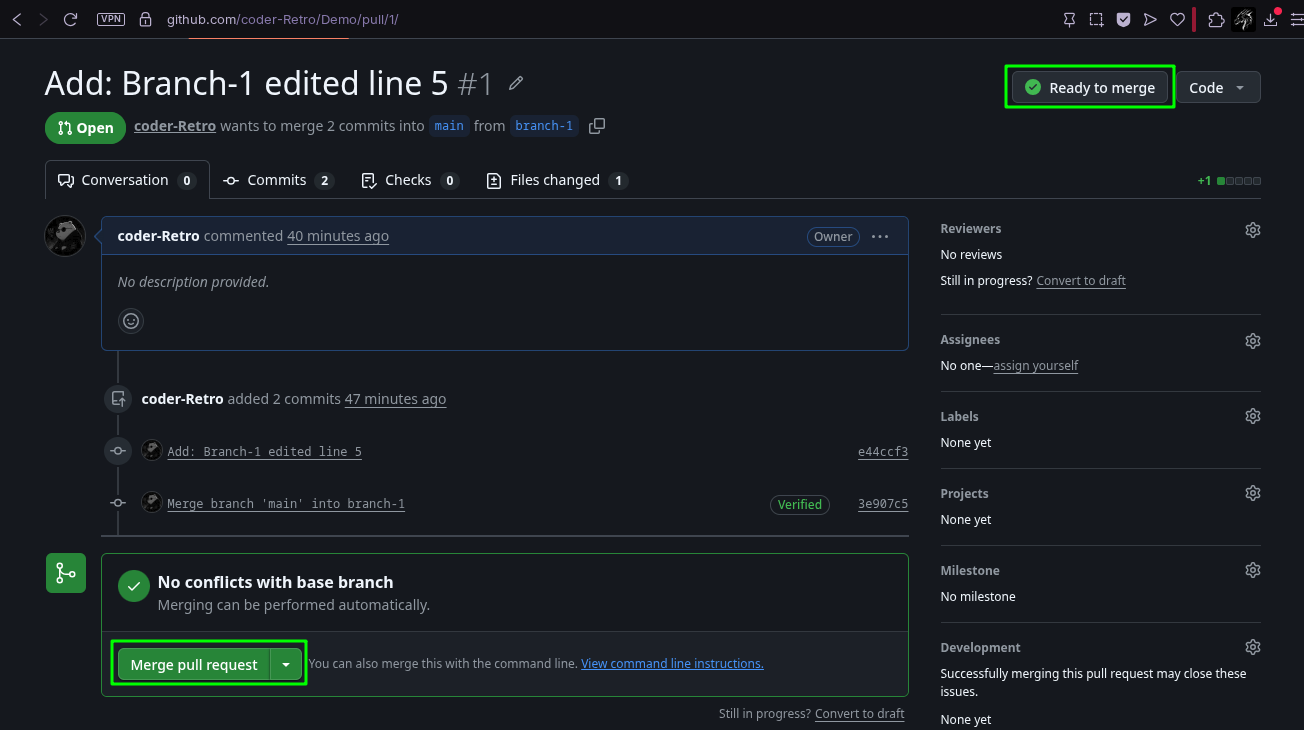
Merge your PR by using the merge PR option at the bottom, you will see that your PR has successfully been merged into the main, you can verify this by going to main if you want.
Cleanup
#Now let's go back to our terminal and update our local repo's main to remote's main. And also delete branch-1 and branch-2 to perform the cleanup.
git switch main
git pull origin main
git branch -d branch-1
git push origin -d branch-1
git branch -d branch-2
git push origin -d branch-2
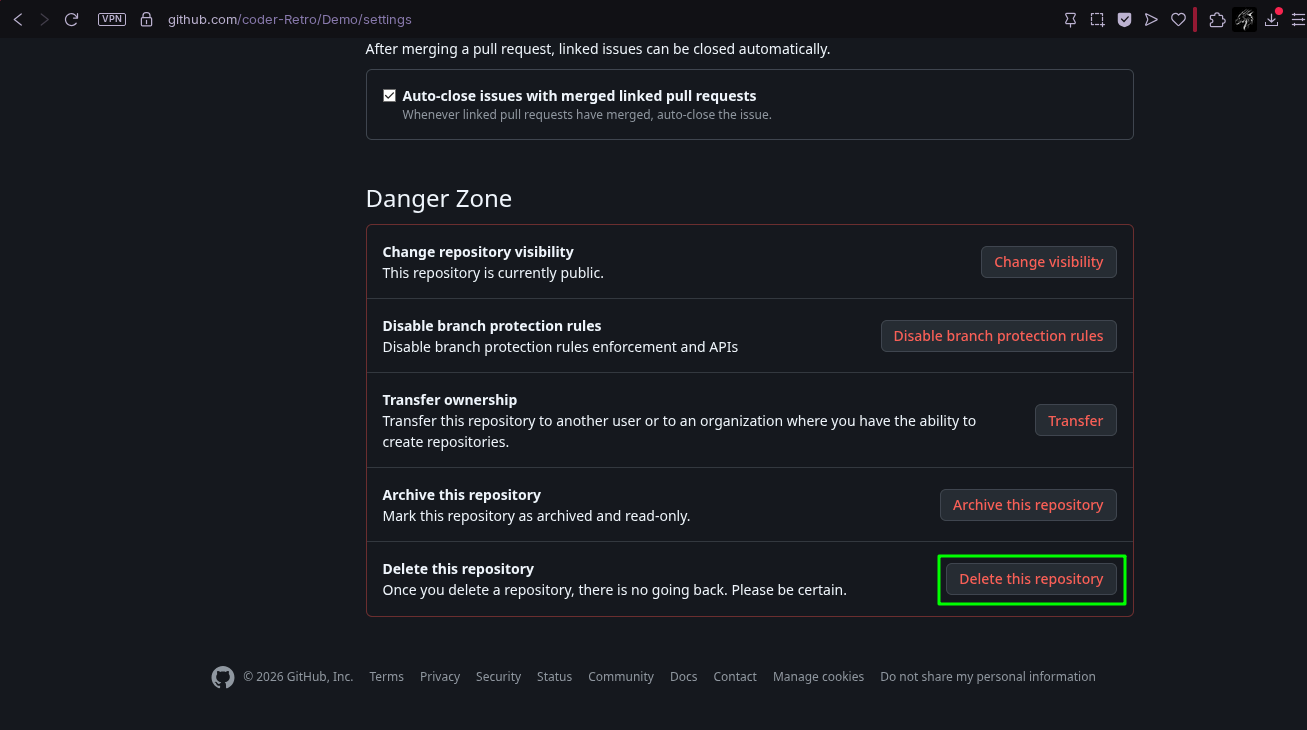
Your can run git branch to verify the cleanup if you want. Congratulation! you have learnt what merge conflicts are, how they form and how you can fix them. We are officially done with our git and GitHub guide so let’s delete our Demo repo and mark an end to this journey. You can delete a Repo by going to the “Settings” tab on GitHub.
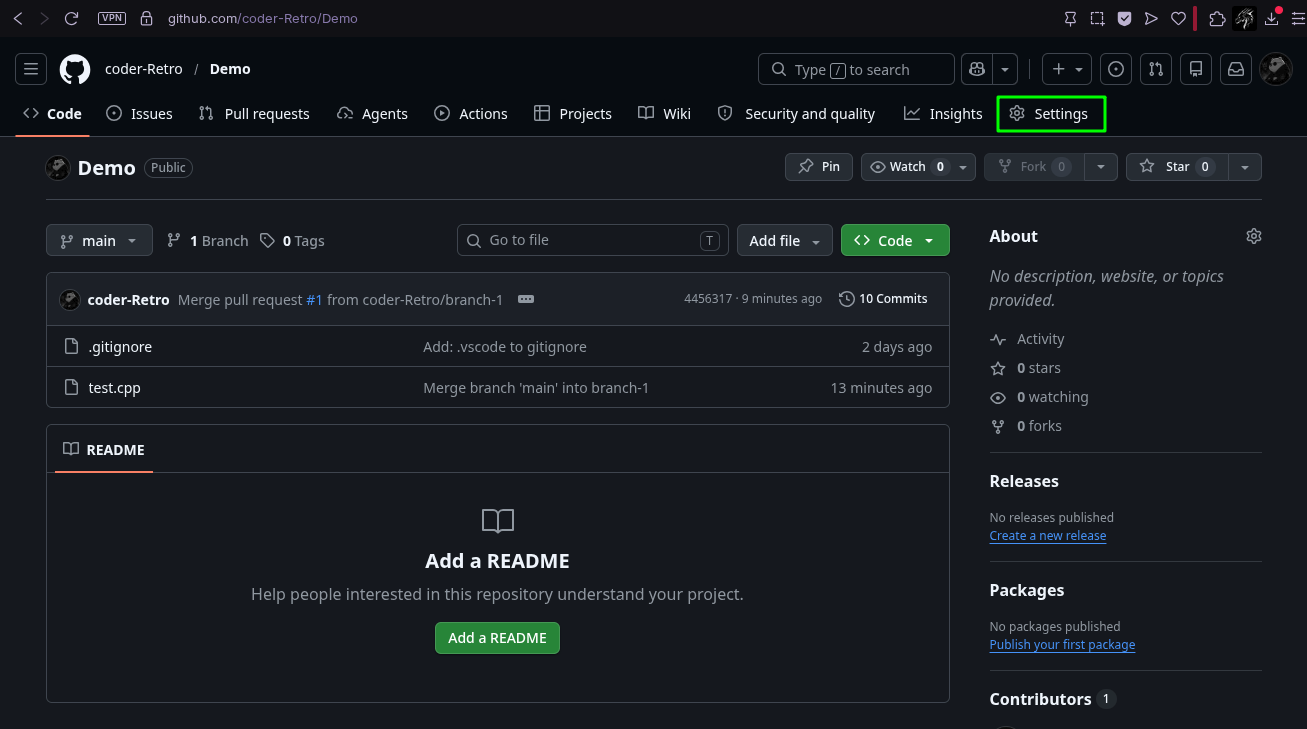
Then scroll to the bottom of the page and you will see a "Delete This Repository" button, click it:
It will ask you to confirm that you want to delete the Repo. If you don't need the repo and are sure to delete it, confirm it. It might ask you to retype the Repo name, so just copy it from the above and paste it below:
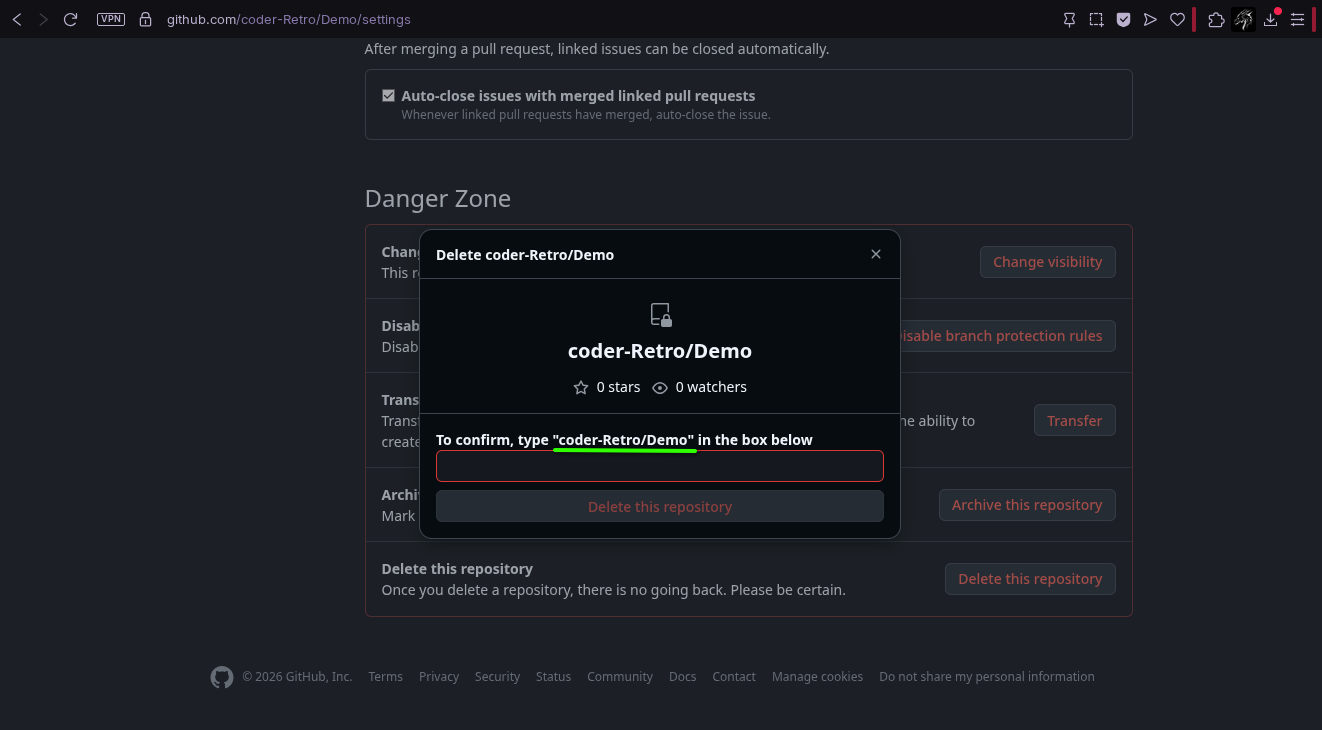
Now normally you would be sent a code to your email which you need to enter here and delete the repo, but if someone has setup the "GitHub Mobile App" then you will see a "Number" on your system's screen, and now you need to open the app and enter that "Number". Either way, Repo will be deleted.
Summary
#In this guide, we learnt:
- Git Setup
- GitHub Setup
- Repo Setup
- Pushing Files to Repo
- Cloning Repo
- Branch Management
- Branch Merging
- Basic Version Control
- Advanced Version Control
- Merge Conflict
With these skills, you have developed all the ability to handle a project using git and GitHub, whether it is your solo project or a collaborated one. Best of luck ahead with this knowlede guys, hope I was able to help you in your learning journey. I am Kaido and this has been a really long, but beautiful journey, Sayonara!
Credits
#I would like to say thanks to my friend "Velanora" for her help during the making of this guide, as her help allowed to tackle a really complex topic of git and GitHub which is merging PRs. So credits to her and also, she herself is a blog writer and documents her learning journey so you can checkout her blogs at "
Velanora Blogs".